# Introduction

This section will give you an overview of the  Omniva.

Need a consultation? Now, it's as easy as reaching into your pocket. Introducing Omniva, your go-to solution for accessible and convenient health consultations. With Omniva, you can connect with healthcare professionals from the comfort of your home or wherever you are.

Discover the simplicity of Omniva, designed for effortless use by both you and your healthcare provider. Omniva empowers you to take control of your health, offering a user-friendly experience tailored to your needs. In the healthcare industry, Omniva is the solution that puts you in the driver's seat, ensuring that healthcare revolves around what works best for you.

## Who will be the users of the Onboarding Board?

#### Patient

1. **Accessible Healthcare Services:** Omniva puts healthcare in your hands, offering convenient access to virtual consultations, Referring Provider and Family Inclusion, and Total Appointments Overview&#x20;
2. **Patient-Centric Health Opportunities:** Omniva offers exclusive health opportunities designed specifically for you, ensuring a tailored and effective approach to your well-being.
3. **User-Friendly Platform:** Omniva is designed with you in mind, providing a platform that is easy to use, navigate, and understand.
4. **Empowering Patients:** Take control of your well-being with a user-friendly platform that enhances your healthcare experience.

**Healthcare Providers**

1. **Efficient Telehealth Services:**
   * Unlock new revenue streams with Omniva, offering premium telehealth services and advanced health monitoring. It's your gateway to efficient, modern healthcare solutions.
2. **Enhanced Patient Engagement:**
   * Keep your patients connected and engaged through Omniva's dynamic platform. Simplify healthcare delivery and foster strong patient relationships.
3. **Customizable and Brand-Aligned Platform:**
   * Tailor Omniva to align seamlessly with your healthcare facility's brand. Ensure a personalized and professional touch in every interaction, making the platform uniquely yours.

#### **Healthcare Industry**

1. **Centralized Health Data:**
   * Omniva acts as a central hub, aggregating patient health information. This centralized approach ensures streamlined access, allowing for more efficient healthcare operations.
2. **Shorter Service Cycle:**
   * Optimize your healthcare service cycle with Omniva, reducing response times and enhancing overall efficiency
3. **Streamlined Automated Health Data Management:**
   * Omniva's automated features simplify patient health data management, reducing administrative burdens for healthcare professionals and enhancing focus on quality patient care, creating a streamlined and patient-centric healthcare experience.

<br>


# Getting Started

This getting started guide will help you explore the platform in 5 easy steps.

## 5 Easy Steps

### 1. Sign In to the Admin Panel

1. On successful onboarding, you'll receive the platform URL and username on your registered email address.
2. Click on the URL, enter the username and password (same as you entered while onboarding).
3. Logged In Successfully!!

### 2. Customize Appearance

1. After successful login, go to the "Setting" from the left panel.
2. Click on the "Appearance" tab to customize the platform.<br>

   <figure><img src="/files/L9fngYosdDBLQfsCDnpJ" alt=""><figcaption><p>Appearance in Admin Panel</p></figcaption></figure>
3. Choose the "Custom" theme mode.&#x20;
4. You can rebrand the platform by entering your company name, description and copyright text.
5. You can also select your platform's primary colour and upload your company's logo and favicon which will reflect all over the platform.
6. Also, you can customize the font text of the whole platform by selecting the font style.
7. Click on Visit Website to view your branded telehealth platform.

## 3. Setup Availability of Service Provider

1. To explore appointment booking on the platform, you need to set up the provider's availability.
2. Click on the profile icon and click on the **Switch Profile > Service Provider**. This will open the service provider panel.
3. Go to the "Availability" section from the side panel.<br>

   <figure><img src="/files/ehYE1sWMuMyJT0dJ2dhl" alt=""><figcaption><p>Manage Provider Availability</p></figcaption></figure>
4. Select the date for which you want to set your availability.
5. A pop-up window will appear, allowing you to set your availability for that specific date.
6. Choose the available slot range by selecting the start and end times for your availability.
7. Specify whether your availability is for online or in-person appointments by marking the appropriate option.
8. Once you have specified your availability and any repetition settings, click on the "Save" button to confirm.
9. Your availability will be saved and reflected in the appointment scheduling system.

{% content-ref url="/pages/eWnKkTGrnbFzdXzFuaer" %}
[Availability](/consulting-provider/availability)
{% endcontent-ref %}

### 4. Book Appointment

1. From profile icon choose the "Patient".
2. Go to the "Appointment" section from the side menu.<br>

   <figure><img src="/files/NHYEfjoLNXbwKL8HHk31" alt=""><figcaption><p>Appointment</p></figcaption></figure>
3. Click on "Add Appointment" button.
4. Choose the patient from the patient list.
5. Determine the specialization required by the patient.
6. Choose the appropriate service provider for the appointment.
7. Select the availability of the service provider.
8. Document the medical history of the patient.
9. Save all appointment details upon completion.

{% content-ref url="/pages/j6PNf8ewRk87Id8XiNyv" %}
[Appointment](/patient/appointment)
{% endcontent-ref %}

### 5. Connect Your Domain

[Schedule a meeting](#user-content-fn-1)[^1] with our team to easily connect your domain with telehealth and have it live at its own address.

[^1]: <https://calendar.knovator.com/team/omniva/discovery-call>


# Stripe Integration

This document will guide you through the transaction enabling process for your platform

### Introduction

Stripe is a tool that helps to accept payments online in a safe and straightforward way. When you connect Stripe to your platform, you can manage transactions smoothly, making it easy for your users to pay. It's all about giving them a hassle-free payment experience.

### Integration Overview

* This documentation outlines the steps required to integrate Stripe into your platform for processing payments that are redirected to specific clinics.
* The integration involves configuring payment settings in your admin settings and setting up webhook events to listen to events related to payment processing.

### Registering with Stripe

1. Log in to Omniva platform's admin dashboard.
2. Navigate to the settings section and select payment configuration.
3. You'll find an option to integrate with Stripe. Click on it to proceed.
4. You'll be directed to the Stripe login page. If you don't have a Stripe account, you can create one by following the registration process.
5. After logging in, you'll land on the home section of your Stripe account, and click on the developer button.<br>

   <figure><img src="/files/WUKkCq80uo20rGPd5WFg" alt=""><figcaption><p>Click on "Developers" button</p></figcaption></figure>

### Adding Webhook Events

1. In the developer button, locate the option in the webhook tab.

<figure><img src="https://t8411958.p.clickup-attachments.com/t8411958/1a95c566-f25e-40ab-a768-796e657c9148/image.png" alt=""><figcaption><p>Click on "Webhook" tab</p></figcaption></figure>

2. Click on the add an endpoint.

<figure><img src="https://t8411958.p.clickup-attachments.com/t8411958/ea3ecb38-d1fe-4e76-bd45-12e75c29e139/image.png" alt=""><figcaption><p>Click on " Add an endpoint" button</p></figcaption></figure>

3. Input the Endpoint URL provided by our platform. This URL is where Stripe will send notifications about payment-related events.

<figure><img src="https://t8411958.p.clickup-attachments.com/t8411958/0d42f1d1-42cc-471a-b91b-f416a5f6b326/image.png" alt=""><figcaption></figcaption></figure>

4. Click on the "Select Events" button.
5. Select all events that our platform needs to listen to, such as account, balance, customer, etc.

<figure><img src="https://t8411958.p.clickup-attachments.com/t8411958/7b026190-2d14-4030-9bb9-353c5e723657/image.png" alt=""><figcaption></figcaption></figure>

<figure><img src="https://t8411958.p.clickup-attachments.com/t8411958/88adcb37-1548-4cce-898e-31ea8a6e22ab/image.png" alt=""><figcaption></figcaption></figure>

6. After filling out all the details, click on the "Add endpoint" button.

<figure><img src="https://t8411958.p.clickup-attachments.com/t8411958/aece85c6-7905-4194-be65-0b3509cc9ad5/image.png" alt=""><figcaption><p>Click on "Add endpoint" button</p></figcaption></figure>

7. Once you've configured the webhook events, the integration process is complete.


# Dashboard

The Dashboard page provides insights on revenue, patient count, appointments, and analytics through informative graphs and reports.

Overview

1. The dashboard is the first page of the Admin Panel that an admin views after login.
2. &#x20;It provides a central hub for navigating key functionalities and accessing important information.

## Dashboard For Admin

Here, you can access important information such as total patients, appointments, missed appointments, new user registrations.

<figure><img src="/files/dpQVDRk3e7dem5XbJXxH" alt=""><figcaption><p>Dashboard</p></figcaption></figure>

### Revenue

Total number of revenue generated from the platform.<br>

<figure><img src="/files/VqIlfKj9mOou58cKOGuI" alt=""><figcaption><p>Total Revenue</p></figcaption></figure>

### **Patient**

Total number of patients who registered on the platform.

<figure><img src="/files/QTRjHTziDr9D0rCeLvCb" alt=""><figcaption><p>Total Patient</p></figcaption></figure>

### **Appointment**

Total number of appointments which is booked by the patient, admin. It contains the upcoming and completed status of the appointment.

<figure><img src="/files/rZLyxM1CNGtga7QMOaGy" alt=""><figcaption><p>Total Appointment</p></figcaption></figure>

### **Missed Appointment**

It displays the number of missed appointments by the patient, provider and both

<figure><img src="/files/qF7rb7CQd9IcnXQ9j7M2" alt=""><figcaption><p>Missed Appointment</p></figcaption></figure>

### **Analytics**

&#x20;Here, you can see the analytical graph of appointments and new users.

1. **Appointment**

* The system generates bar graphs representing the number of completed or cancelled appointments within the selected time interval.
* Each bar on the graph corresponds to a specific time period (e.g. last 1 week, last 15 days, last 1 month, last 6 months), depending on the chosen interval.
* Admin can access a detailed insight about the appointment within the platform by clicking on the "**View Full Report**" button in the admin panel.

<figure><img src="/files/PpG7xDNboeHU4eWWhLoB" alt=""><figcaption><p>Appointment</p></figcaption></figure>

2. **New User**

* The system generates a bar graph representing the number of new registrations within the selected time frame for patients, consulting providers, and referring providers.
* Each category (patients, consulting providers, referring providers) is represented by a different color on the graph.
* Each bar on the graph corresponds to a specific time period (e.g. last 1 week, last 15 days, last 1 month, last 6 months), depending on the chosen interval.
* Admin can access a detailed insight about the and new users within the platform by clicking on the "**View Full Report**" button in the admin panel.

<figure><img src="/files/mSVDGjnlGsjZ5miI12qo" alt=""><figcaption><p>New User</p></figcaption></figure>

### **Calendar**

* It will contain a calendar that shows the availability of the service provider in day, week and month.
* Users can disguise with colour when the service provider is available colours are blue and the colour is yellow which means the service provider is booked in that slot.
* Further users can book an appointment for an available slot.

<figure><img src="/files/AqWBCT7deLC5L0Y2DH0y" alt=""><figcaption><p>Calendar</p></figcaption></figure>

### Onboarding Guidelines

* Users can access the onboarding guidelines by clicking the **rocket icon** on the admin dashboard. These guidelines will help you set up the platform's basic steps efficiently.
* **Set Up Appearance**
  * Upload your logo and choose theme colours for the platform.
  * Access the Appearance section via the **"Set Up"** button.
* **Set Up Clinic**
  * Enter clinic details, locations, and domain settings.
  * Click **"Set Up"** to configure your clinic.
* **Set Up Services**
  * Add services, set fees, and assign them to clinics.
  * Use the **"Set Up"** button to manage services.
* **Set Up Providers**
  * Add and manage healthcare providers.
  * Click **"Set Up"** to proceed.
* **Book Appointment**
  * Learn how to book appointments by switching to a patient’s view.
* **Connect with Your Domain**
  * Link your custom domain for a seamless, branded experience.
  * Click **"Connect Domain"** and follow the instructions.
* **Copy Code to Link on Your Website**
  * **Booking Feature**: Click the copy icon next to **"Book Appointment"**, and share the code with your developer to embed it.
  * **Login Feature**: Click the copy icon next to **"Login"**, and provide the code to your developer.
  * **Sign-Up Feature**: Click the copy icon next to **"Sign Up"**, and share it for integration with your website.

<figure><img src="/files/jXElchS4EzpkwNAFi8wk" alt=""><figcaption><p>Onboarding Guideline</p></figcaption></figure>


# Appointment

This page provides insights on all appointments list, filter with status.

## Overview

The section equips admins with the tools to efficiently organize, monitor, and handle patient appointments.&#x20;

1. The Appointment Management section equips admins with the tools to efficiently organize, monitor, and handle patient appointments.
2. This includes overseeing appointment details, approving appointments, joining video calls, rescheduling, and cancelling appointments as necessary.

### **Appointment List**

View the list of appointments displayed, encompassing patient names, referral provider names, referring dates, appointment type, appointment statuses, service provider names and Actions.

<figure><img src="/files/tFiBdRDs7gGWyNIzc139" alt=""><figcaption><p>Appointment List</p></figcaption></figure>

**Detail of listing**

1. **Patient Name**
2. **Appointment Type:** It shows whether the patient has booked the appointment Online or in person.
3. **Appointment Status:** There are four types of status
   1. **Pending:** If the patient/admin can book the appointment then records will be maintained under pending status.&#x20;
   2. **Upcoming:** Admin/consulting providers after approval of appointment the records of the appointment will be maintained under upcoming status.
   3. **Completed:** If the consulting provider completes the appointment successfully. Then the records will be maintained in completed status.
   4. **Cancelled:** If the consulting provider/admin can cancel the appointment, records of the appointment will be maintained in cancelled status.
4. **Action:** There are 4 types of action
   1. **View:** Here you can see the details of the appointment
   2. **Approve:** If the status is pending. Then the approve icon is visible to the admin, from here admin can approve the appointment on behalf of the consulting provider.
   3. **Cancel:** Cancelling an appointment prompts a pop-up screen where admins can provide a reason for cancellation before submitting the form.
   4. **Join Video Call:** After the approval of the appointment, the admin can also join the video call
   5. **Reschedule:** The admin can also reschedule the appointment.

### **Add Appointment**

To add a new appointment, adhere to these steps:

<figure><img src="/files/0xqx6YC1IFiihHA4RaR2" alt=""><figcaption><p>Add Appointment</p></figcaption></figure>

1. The system presents options to choose between **Existing Cases** and **Create New Cases.**
2. **Select Case Type** (**Existing Case**): A search and listing interface appears, allowing him to filter cases. A list of active case loads, displaying relevant details like case number and status. And for ongoing steps, all fields are auto-filled such as specialization, provider and medical history but you have the flexibility to change any field.<br>

   <figure><img src="/files/KsCg9l73dQbojSJuFpfS" alt=""><figcaption><p>Existing Case</p></figcaption></figure>
3. **Select Case Type** (**Create New Case**):  The system prompts the patient to search for a current patient profile. After the appointment is booked and approval from the service provider, the new case number is created.<br>

   <figure><img src="/files/sNXDSTHbVMOa81N7LzfU" alt=""><figcaption><p>Create New Case</p></figcaption></figure>
4. **Specialization**: Select the appointment type or medical specialization.<br>

   <figure><img src="/files/bWFD4ug9PacEHkDXZMPt" alt=""><figcaption><p>Specialization</p></figcaption></figure>
5. **Provider Display**: Choose a provider or let one be assigned. Also, you can see the profile of the doctor and their rating and reviews.<br>

   <figure><img src="/files/qQtFcaxTOXOcOSqZjjk2" alt=""><figcaption><p>Select Provider</p></figcaption></figure>

   <figure><img src="/files/rsFaLBZZJRjD2WMd38Ah" alt=""><figcaption><p>View profile of provider</p></figcaption></figure>
6. **Time Slot Selection**: Pick a suitable time slot.

   1. At the top, you can see a calendar with available dates.
   2. Click on the date you prefer from the options provided. The dates shown in white are available for booking.
   3. Below the date, you will see the duration of the appointment (e.g., 15 minutes).
   4. You can choose either **Online** or **In-person** for your appointment type by clicking on the buttons.

   <figure><img src="/files/eiaQMbFR1Gzr6nSvZKG7" alt=""><figcaption><p>SelecT time slot</p></figcaption></figure>
7. **Medical History:** Document the medical history of the patient.
8. **Payment Details**: User can find the details of the payment related to their appointment.&#x20;
   1. **Appointment verification details:** You can see the all details related to the appointment.
   2. There is the option of the selection of the **insurance** or **package** (If any package is available to the patient).
   3. **Wallet Money:** Admin will use their add money to deduct the total charges. If the patient has the money. Then admin simply books the appointment with no need to add the money.

### **Filter and Search functionality**

1. Utilize the search bar to efficiently find appointments by patient name, referred provider name, or appointment status.
2. Employ filtering options to sort appointments based on their status (all, completed, pending, upcoming, cancelled).&#x20;
3. Exporting appointment data facilitates comprehensive analysis and management of referrals beyond the system if necessary.

<figure><img src="/files/b30uZX7ObC9pt2BYokjA" alt=""><figcaption><p>Apply Filter</p></figcaption></figure>


# Referrals

On this page admin efficiently tracks, manages, and add referrals for comprehensive patient care.

### Overview

The section of the Admin Panel empowers you to efficiently track and manage referrals initiated by both patients and providers.&#x20;

This includes overseeing vital details such as patient names, referred provider names, referral request dates, and appointment statuses (completed, cancelled, pending).

<figure><img src="/files/kAGHveS8JRGv2Xbqh8mY" alt=""><figcaption><p>Referrals</p></figcaption></figure>

### **Referrals List**

View the list of referrals, including patient names, referred provider names, request dates, and appointment statuses.

<figure><img src="/files/PzgnTVaSaHEuxqkDvncH" alt=""><figcaption><p>Referral list</p></figcaption></figure>

### **Action**

1. Click on an eye icon to access more information about the referral.<br>

   <figure><img src="/files/L0FermCm7UOPIN1omLPQ" alt=""><figcaption><p>View Referral Information</p></figcaption></figure>
2. Click on the tick icon here admin approves the referral. After clicking on the tick icon pop-up, the appear can also attach the refer notes on behalf of the referring provider.<br>

   <figure><img src="/files/7xnSCWTjiebsXNzKar2W" alt=""><figcaption><p>Approve the referral</p></figcaption></figure>
3. Click on the cross icon admin can cancel the referral appointment.<br>

   <figure><img src="/files/7gmyC0Rf8pp0juajElrq" alt=""><figcaption><p>Cancel the referral</p></figcaption></figure>
4. After approval, the admin can book the appointment.

### **Search and Filtering Functionality**

1. Utilize the search bar to efficiently find referrals by patient name, referred provider name, or appointment status.

<figure><img src="/files/v0LEA7W8O0bjuM3vO8XH" alt=""><figcaption><p>Search</p></figcaption></figure>

2. Employ filtering options to sort referrals based on their status (all, completed, pending, cancelled).&#x20;

<figure><img src="/files/6hgyE1Y7EI5QkLOwrrLe" alt=""><figcaption><p>Filter by status</p></figcaption></figure>

3. Exporting referral data facilitates comprehensive analysis and management of referrals beyond the system if necessary.

<figure><img src="/files/pXR0zkRcQFVUrbTzL4OU" alt=""><figcaption><p>Export</p></figcaption></figure>

### **Adding Referrals**

To add a new referral, follow these simple steps:

<figure><img src="/files/k1Jmh0Svq83K1My6AQzQ" alt=""><figcaption><p>Add referral</p></figcaption></figure>

1. **Click "Add Referral":** Initiate the process by clicking on the "Add Referral" button.
2. **Enter Details:** Fill in essential information such as patient name, and specialization, and select the referral provider name and the reason for referral.
3. **Save Referral:** Once all details are entered, save the referral to ensure accurate record-keeping.


# E-Form

Admin can manage e-forms: View, edit, share, and create e-forms efficiently.

In this section, you will find the all e-forms that which admin is created.

<figure><img src="/files/TZyMqyaH9Imd1oslBocK" alt=""><figcaption><p>List of E-form</p></figcaption></figure>

### Viewing&#x20;

1. **Name:** It shows the name of the E-form.
2. **Date:** It shows when the e-form is created.
3. **Active:** With the toggle button admin can perform the active/ inactive e-form.
4. **Action:** Admin can perform four types of action\
   1\. **Edit :** Here admin can edit the e-form information\
   ![](/files/1ljWFNgzOV0NjMbjwv29)\
   \
   2\. **Share:** From this share icon admin can share the e-form with the patient. After clicking on this icon you will see the lists of the patients and see their status such as pending, in-progress, or completed. Search the patient by it name and if you want to assign e-form select the name from the search bar.\
   ![](/files/ED66vgC4DOX547hnahKY)\
   3\. **Question Icon:** After clicking on this icon admin can also add the question.\
   ![](/files/mb7am6BUe5SerewVseGw)\
   4\. **Delete:** If admins want to delete the e-form then by clicking this icon it will be deleted from the list.

### Create E-form

From here "Add article" button admin can add the article.

<figure><img src="/files/klrelVinqkEZuFNyst4j" alt=""><figcaption><p>Add article</p></figcaption></figure>

After clicking on add article the side drawer will be open.

List the fields to be filled by admin such as selecting multiple clinics, title name, and description.


# Case Management

This page will contain a centralized hub for managing patient cases, appointments, and follow-ups.

## Overview

The **Case Management System** helps admins easily manage patient cases and appointments across different clinics from one place.

<figure><img src="/files/NeTUOvOjuajLym0IAFg4" alt=""><figcaption><p>Case Managment</p></figcaption></figure>

## Listing

1. **Case Number:** The case number is autogenerated by the system.
2. **Clinic:** The specific healthcare clinic where the patient's case is managed.
3. **Patient Name:** The name of the patient associated with the case.
4. **Provider Name:** The healthcare provider responsible for treating the patient.
5. **Total Number of Appointments:** The appointments scheduled for the patient's case.
6. **Actions (view, add appointment):** Options to view case details or schedule new appointments.

## **Searching and Filtering Cases**:

1. Admin can search for a specific case using the search bar.
2. Filters can be applied based on **Clinic Name**, **Provider Name**, and **Patient Name** to narrow down cases.

## View

1. Clicking the **"View" icon** in the Action column redirects the admin to a detailed view of the selected case.
2. In the detailed view, the admin can toggle between three tabs: **Appointments**, **Notes**, and **Follow-up Links**.
   1. **Appointments Tab**: Lists all associated appointments categorized by status (upcoming, completed, or cancelled). Each appointment includes information about the referral provider, referring date, specialization, appointment type, and service provider.
   2. **Notes Tab**: Displays all notes attached to the patient by the service provider, organized by the appointment linked to this case.
   3. **Follow-up Links Tab**: Displays follow-up links under the same case.

<figure><img src="/files/5HlDpMCXahLopa2E25Sv" alt=""><figcaption><p><strong>Viewing Case Details</strong></p></figcaption></figure>

## **Adding an Appointment**

1. Clicking the **"Add Appointment"** button opens a side panel form.
   1. The **Case ID** is pre-filled based on the case being viewed, and the **patient name** is auto-selected.
   2. Admin can edit fields such as specialization, provider name, appointment slots, and medical history.
2. After filling out the form, the admin submits the appointment, which will be listed as **pending** in the case until approved by the provider or admin.
   1. Once approved, the appointment status will change from pending to upcoming.

<figure><img src="/files/MP3FbAOPbe6autUB0Pie" alt=""><figcaption><p>Add appointment</p></figcaption></figure>

## **Handling Appointment Creation in Other Sections**

1. If the admin adds an appointment from other sections (Provider, Patient, Family, Appointment Dashboard), they must choose between an **Existing Case** or **Creating a New Case** in the initial step.
   1. **Existing Case**: The admin can search for the case using the **Case Number**, **Patient Name**, or **Service Provider Name**. The case card displays important details like the consulting provider's name, total appointments, and upcoming appointments.
   2. **New Case**: The admin can search for the patient by name. The card will contain the patient’s name, DOB, and gender, and the admin can proceed with adding the case and appointment.

## **Managing Patient Notes and Follow-Up**

1. In the **Notes** tab, the admin can view and manage any notes related to the patient and appointments.<br>

   <figure><img src="/files/7y4F18mTSZ4ouMj43hYA" alt=""><figcaption><p>Note</p></figcaption></figure>
2. The **Follow-Up Links** tab shows all follow-up appointments linked to the case.


# Users

In this section admin will find all users in the platform such as service provider, patient, their family, and users(admin, clinic admin, and support staff).

The next page will help you to find the service provider.


# Providers

Here's a brief overview of the providers-related functionalities available.

### Overview&#x20;

As a Super Admin, you have the authority to manage all providers within the platform, including Consulting Providers and Referring Providers.&#x20;

<figure><img src="/files/1fXL6DmnvUXVro0Msl8w" alt=""><figcaption><p>List of providers</p></figcaption></figure>

Admin can view a listing of all providers along with their details.

* **Search and Filter:** Admin can search for a provider by name and filter the listing by clinic name for easier navigation.
* **Invite Service Provider:** Through this button, the admin can add a provider in the platform. When the admin clicks on this button, a new form will open where the admin can fill in the provider details such as first name, last name, email, phone number, and select the clinic. Then email will be sent to the patient with their credential access.<br>

  <figure><img src="/files/RykzqbJMfanD1cdlRhAt" alt=""><figcaption><p>Invite the Service Provider</p></figcaption></figure>

### **Viewing Provider Profiles**

* **Access:** Admin can click on a particular provider to access their profile.
* **Analytics:** Details of total revenue, total patient, total number of appointments.
* **Comprehensive Details:** The provider profile provides detailed information about the provider profile, patients list, service offered, pending referral, appointment, Transaction, availability, settings
* **Action:**
  * **Edit:** The admin can edit details such as first name, last name, professional details, service offered, etc.
  * **Add Appointment:** On behalf of the patient, the admin can also access to book the appointment.
  * **Add Referral:** On behalf of the patient, the admin can also access to add the referral.

### **Adding Service Provider**

* Click on the "Add Service Provider" button to add a new provider.
* Fill in the required fields such as name, contact information, specialization, etc.
* Specify whether the provider is a Consulting Provider or a Referring Provider.
* Add the details for the 6 stepper form.
* Save the details to add the provider to the platform.

<figure><img src="/files/plFwk9fon364qa0o5u7J" alt=""><figcaption><p>Add Service Provider</p></figcaption></figure>

### **Approving Providers**

* Review the list of providers pending approval.
* Activate physicians pending approval after they register with a specific clinic.
* In case a clinic admin faces login issues, you can approve the physician on behalf of the clinic admin.

### **Activating/Deactivating Providers**

* Activate or deactivate a particular provider associated with a specific clinic as needed.
* Edit, activate, inactivate, or decline any provider's panel as required.

### Action

* Review pending referrals created by providers or patients.
* Check the services offered by each provider, along with associated costs for follow-up and new consultation appointments.
* Monitor the slots and availability of providers within the Settings section.
* Manage the availability of providers' time slots for patient appointments.

<figure><img src="/files/aJKk81b7vsZsqWTaWuGi" alt=""><figcaption><p>Availability</p></figcaption></figure>

* ### Manage Availability

  * The **Manage Availability** page will appear where you can customize provider working hours and other related settings.
  * **Configuring Availability**

    **Step 1: Time Zone**

    1. At the top of the **Manage Availability** page, you'll find the **Time Zone** dropdown.
    2. Select the appropriate time zone for your location from the dropdown list.

    **Step 2: Slot Duration**

    1. Next to the time zone, select the desired **Slot Duration** in minutes (e.g., 15 minutes).
    2. This setting determines the duration of each available time slot for appointments.

    **Step 3: Break Duration**

    1. Use the **Break Duration** option to set the amount of time (in minutes) you want to allocate between appointments.
    2. You can adjust the break duration by using the plus (+) or minus (-) buttons.
  * **Setting Weekly Availability**

    **Step 1: Choose a Day**

    1. You will see a list of days (Sunday to Saturday) with toggle switches next to them.
    2. Toggle on the days on which you are available for appointments.

    **Step 2: Set Time Slots**

    1. For each day you toggle on, you can configure your availability as follows:
       1. **Start and End Times**: Use the time pickers to set your working hours for that day (e.g., 8:00 AM – 8:00 PM).
       2. **Slot Type**: Select the slot type (e.g., **Online**, **In-person**, or other options if available).
       3. **Add Multiple Slots**: If you wish to have multiple availability slots in one day, click the **plus (+)** button to add another time slot.

    **Step 3: Copy Schedule**

    1. The copy icon (clipboard symbol) allows you to copy the availability settings of a particular day to other days.
    2. Click the copy icon, then choose the day to which you want to apply the same schedule.
  * **Date Overrides**
    1. If you have special dates when your availability differs from the usual schedule, use the **Date Overrides** option.
    2. Click **Add an Override** on the right-hand side of the page.
    3. You can set specific dates and customize the available time slots for those particular dates.
  * **Saving Changes**
    1. Once you have configured your availability, all changes will automatically be saved, as indicated by the "Availabilities updated successfully" message in the top-right corner.

  By following these steps, you can effectively manage provider availability and ensure provider appointment slots are correctly displayed to patients on the platform.


# Patient

Here's a brief overview of the patient-related functionalities available.

### Overview

As an Admin, managing patient profiles is a crucial aspect of ensuring accurate records and providing efficient healthcare services.&#x20;

<figure><img src="/files/akHvadb2VQElEYGNNkTp" alt=""><figcaption><p>Patient</p></figcaption></figure>

Admin can view a listing of all patients along with their details.

* **Search and Filter:** Admin can search for patients by name and filter the listing by clinic name for easier navigation.
* **Add patient:** Through this button, the admin can add a patient in the platform. When the admin clicks on this button, a new form will open where the admin can fill in the patient's details such as first name, last name, email, phone number, and select the clinic. Then email will be sent to the patient with their credential access.<br>

  <figure><img src="/files/mtOKFwLQTaSv3zR6693i" alt=""><figcaption><p>Add patient</p></figcaption></figure>

### **1. Viewing Patient Profiles**

* **Access:** Admin can click on a particular patient to access their profile.
* **Analytics:** Details of a total number of appointments and total number of referral.
* **Comprehensive Details:** The patient profile provides detailed information about the patient's demographics, medical history, appointment, referral, follow-up link, mood, goal, and diary
* **Action:**
  * **Edit:** The admin can edit details such as first name, last name, and date of birth to maintain updated records.
  * **Add Appointment:** On behalf of the patient, the admin can also access to book the appointment for that patient.
  * **Add Referral:** On behalf of the patient, the admin can also access to add the referral for that patient.

### **2**. **Different tab**

**Accessing Medical History**

* **Detailed Record:** Admin can access a detailed record of each patient's medical history.
* **Contents:** This includes medication details, examination records conducted that is submitted by patients during the booking of an appointment, and any relevant health information.

**Medical Documents**

* **Detailed Record:** List of the uploaded medical documents, who can upload the document in which date these details are mentioned in the patient profile.
* **Admin Action:** Admin can view, add the document, download the attached document, or fax these documents as needed for reference or sharing with healthcare providers.

**Follow-up Links**

* Healthcare providers can provide follow-up links to patients after appointments.
* **Patient Access:** These links allow patients to easily book an appointment for further examination or follow-up discussions.

**Notes**

* Admin can view patient notes directly from the patient's profile.
* **Options:** They can choose to view the notes in a Notes tab for detailed viewing, download it for offline access, or send it via fax if supported by the system.

**Package**

* A dedicated section for viewing packages purchased by patients, including Client Name, Package Name, Total Appointments, Validity Period, Pricing and Payment Status (Pending/Paid), and Appointment Attendance (Completed, Missed, Remaining).
* Admin can assign or recommend the package to the patient. Packages can be assigned to patients based on their payment status, ensuring accurate tracking of their purchases.

**Monitoring Referrals and Appointments**

* **Referrals:** Admin can see the list of the total referral requests made by an individual patient within through the platform.
* **Appointments:** Admin can see the list of the total appointments booked by an individual patient through the platform.

**Goal**&#x20;

* This section provides a summary of the patient's progress towards their goals.
* Goals include information such as name, cycle, value, start and finish dates, and activation status.

**Mood**

* **Date Range Filter:** Admins can filter mood entries based on the date range using the provided filter option.
* **Listing:**
  * **Sr. No:** Serial number assigned to each mood entry for easy reference.
  * **Date:** The date when the mood entry was recorded.
  * **Mood:** Indicates the emotional state of the patient, such as happy, sad, excited, etc.
  * **Notes:** Optional field for patients to add any additional notes or context related to their mood on that particular date.

**Diary**

* Patients can record or update their daily routine for important hours of the day and make a record of the history of the diary.&#x20;
* **Filter:**
  * Admins can filter diary entries based on the date range, reason, symbol using the provided filter option


# Family

In family section admin can manage family members for appointments, referrals, access patient profiles

### Overview

In this section, you will find the family section where the primary patient is registered as the main patient. The main patient is flexibility to add their family member on behalf of the family member they can book the appointment and add a referral with the service provider. So, in the admin login you can see the list of the patient under which you can also see the list of the family members.

<figure><img src="/files/jszuueRVTvNov53tkcW2" alt=""><figcaption><p>Family section</p></figcaption></figure>

On the left side list of all the family member&#x20;

* **Search and Filter:** Admin can search for patients by name and filter the listing by clinic name, location for easier navigation.
* **Add Family:** Through this button, the admin can add a patient in the platform. When the admin clicks on Add family button, a new form will open where the admin can fill in the patient's details such as first name, last name, email, phone number, and select the clinic. Then email will be sent to the patient with their credential access.<br>

  <figure><img src="/files/4ohZPesksM9pTcJxFoGV" alt=""><figcaption><p>Add Family</p></figcaption></figure>

If you click on particular patient name then it show profile of that patient.

### **1. Viewing Patient Profiles**

* **Access:** Admin can click on a particular patient to access their profile.
* **Analytics:** Details of total number of appointments and total number of revenue from that patient.
* **Comprehensive Details:** The patient profile provides detailed information about the patient's profile, patient lists, services, transactions, appointments, referrals
* **Action:**
  * **Edit:** The admin can edit details such as first name, last name, and date of birth to maintain updated records.
  * **Add Appointment:** On behalf of the patient, the admin can also access to book the appointment for that patient.
  * **Add Referral:** On behalf of the patient, the admin can also access to add the referral for that patient.

<figure><img src="/files/vFOwDdMq1FHvcB4gCDC9" alt=""><figcaption><p>Viewing patient profile</p></figcaption></figure>

### 2. Different Tabs

**Profile**

* Admin can access a detailed record of patient profile such as name , address, in which clinic they registered, etc.

**Patients**

* In this tab admin can find the patient's family member

**Services**

* Here admin can find the in which services the patient's can&#x20;

**Transaction**

* Here, list of all transaction detailed

**Appointment**&#x20;

* Admin can see the list of the total number of appointments booked by a patient and their family member through the platform.

**Referral**

* Admin can see the list of the total referral requests made by a patient within through the platform.


# Users

Manage user details, roles, and permissions efficiently for clinic operations.

### User Management

The User Management Module is a component of our system, designed to streamline the process of creating, assigning roles, and managing user details within your clinics. With this module, you can ensure that each user has appropriate access and permissions tailored to their role and responsibilities.

<figure><img src="/files/b2UV0egF3BUXpXRkugNI" alt=""><figcaption><p>User section</p></figcaption></figure>

### User Listing&#x20;

* **Name:** Full name of the user.
* **Email:** Email address of the user.
* **Role:** Role assigned to the user within the system.
* **Clinic:** Clinic affiliation of the user.
* **Created At:** Date and time when the user profile was created.
* **Last Login:** Date and time of the user's last login.
* **Active/Inactive:** Indicates whether the user account is active or inactive.
* **Action:** Options to edit or delete the user profile.
  * Edit: Admins have the ability to edit assigned clinics for users, providing flexibility for those who need to switch or consult multiple clinics.
  * Delete: Admins can perform actions such as soft delete,
* **Filter users based on role and clinic for efficient management:** Admin can filter and search for users based on their roles or clinic affiliations to efficiently manage user profiles.

**User Creation** **and Role Assignment**

1. Navigate to the User Management Module through the admin section of the system.

<figure><img src="/files/ww2Yp8F8SWzntEREAWEs" alt=""><figcaption><p>Add users button</p></figcaption></figure>

1. **Enter Required Information:** Fill in the necessary details including first name, last name, email address, phone number, role, and clinic affiliation.
2. **Assign Roles:** Specify roles specific to clinics based on the user's responsibilities within the organization.
3. **Save User Profile:** Once all information is entered and roles are assigned, save the user profile.

<figure><img src="/files/00DMXzwr0Bf6MlFZP4GI" alt=""><figcaption><p>Add user </p></figcaption></figure>

Admins have the authority to assign roles to specific users and can later edit them as needed. This flexibility allows for seamless adaptation to changing clinic requirements.

<br>


# Resources

In this section, the admin will find the articles.


# Article

Admin can manage articles: View, edit, and create articles for patient and providers.

### Overview

Admin can also make the article to accessible for patient, providers, clinic admins, and view the list of articles for specific clinic or multiple clinics.

<figure><img src="/files/x37T4fYUtwqHYhTYOty7" alt=""><figcaption><p>Article section</p></figcaption></figure>

### Viewing&#x20;

1. **Image:** Here the image of the upload article
2. **Title:** In this column, it shows the title of the article.
3. **Link:** It shows the link of the article.
4. **Document:** It shows the document of the article.
5. **Clinic: I**t shows the clinic associated with the article.
6. **Status:** Admin has the flexibility to active and inactive the article.
7. **Actions:** Admin has access to edit, delete the article.

### Create article

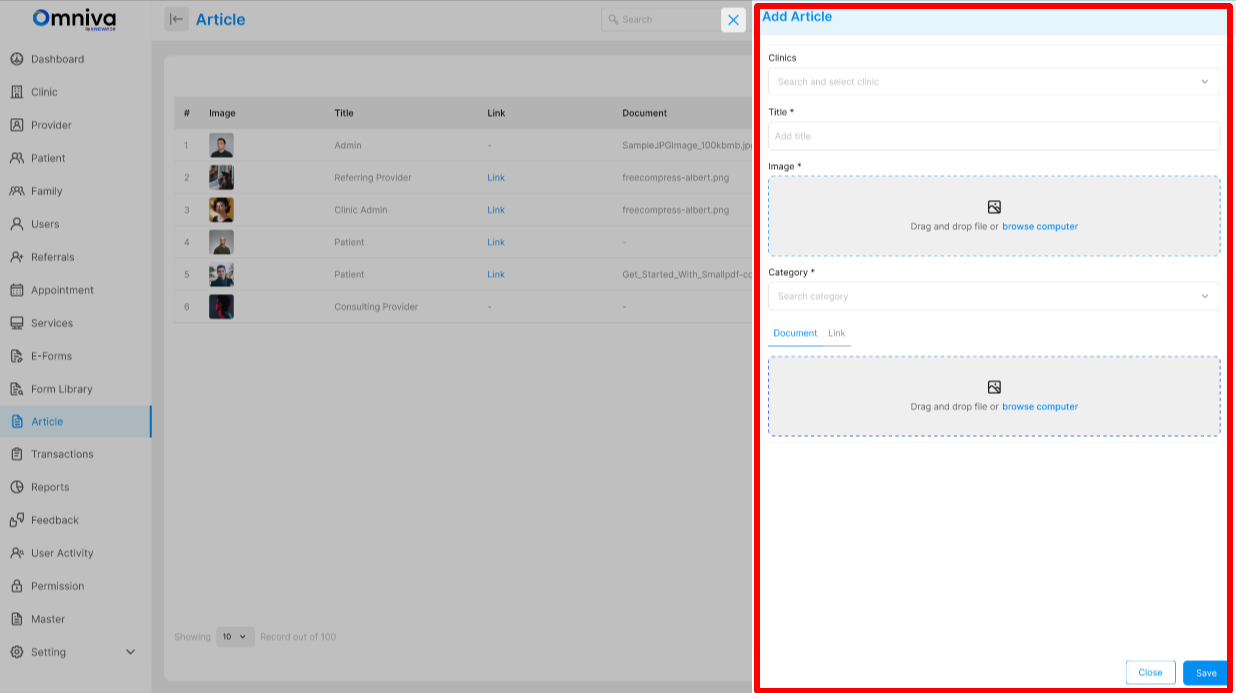
<figure><img src="/files/Jf1kSNQzaDC6Q5N6Al2e" alt=""><figcaption><p>Create article</p></figcaption></figure>

During creating the article you need to fill a details such as clinic name, title, image, category, attached document or link then submit it. It will be listed into the table.


# Reports

In this section admin will find all data reports throughout the platform such as data reports for users, appointments, Revenue, Transaction, User activity.


# Data Reports

Admin can track user activity, appointments, revenue, and generate analytical reports.

### Report Management

The Reports Management section in the admin panel is designed to track user activity and monitor the overall status of the system.&#x20;

The admin can find valuable information here, such as the number of  appointments, revenue, and registered providers.

<figure><img src="/files/l4I05Xsn8LiUwcL36mGo" alt=""><figcaption><p>Report</p></figcaption></figure>

### Analytical Report

* The admin will find various reports available, including the New Users Report, Appointment Report, and Service Provider Report.
* If the status New users then admin finds the analytical bar graph of the new users registered in the platform such as consulting provider, referring provider and patient to distinguish with the different colors.

<figure><img src="/files/ITzhZ3UTbR5Qcxe0QSZ1" alt=""><figcaption><p>New User</p></figcaption></figure>

* If the status is appointment then admin can find the analytical bar graph of appointment with complete and cancelled appointment.
* If the status is revenue then admin can analyze the graph through date and revenue generated.

### **List view**&#x20;

1. **New users:** View the list of new user displayed, encompassing name of registered users, type(whether the user is patient, consulting provider and referring provider), Date of sign up.
2. **Appointment:** View the list of revenue displayed, encompassing Date & slot, Family Name, Patient Name, Service Provider Name, Service Name, Amount, Transaction Status
3. **Revenue:** View the list of revenue displayed, encompassing  Patient Name, Service Provider Name, Date Of Payment, Revenue Amount, Transaction Amount.

### **Search, Filter and Export functionality**

Admin can conveniently search by name. Admins can filter based on clinic name.

Exporting data facilitates comprehensive analysis of new users, appointments, revenue, transactions and average revenue.


# Transactions

Admin can track appointment transactions and download transaction details.

### Overview

Admin can access the list of all transactions of appointments.

<figure><img src="/files/Ox4ILBLTjbKors6FfleS" alt=""><figcaption><p>Transaction List</p></figcaption></figure>

### Viewing&#x20;

* **Transaction Id:** In this column, you will find the transaction ID.
* **Date:** In which date the transaction will happen&#x20;
* **Status:** In this column, you will find the status of the transaction. There are three types of transactions: pending, completed, and cancelled
* **Service Provider Name:** For whom service provider appointment is booked.
* **Patient Name:** In this column list there is patient name for whom appointment is booked.
* **Price:** Charge of the appointment.
* **Service Name:** For what specialization patient booked the appointment.
* **Action:** Admin can download the transaction of the appointment.

### **Filtering and Search**

Admin can conveniently filter based on clinic name, service provider, patient name, services, date range filter, and filter on status. Admins can search for patient name, service provider name.&#x20;


# Feedback

In this section admin can understand user sentiments and improve platform functionality based on feedback.

### Overview

The Feedback section in the admin panel serves as a valuable resource for understanding user sentiments and improving the platform's functionality based on user experiences.

### **Searching and Filtering**

* **Search by user name:** Easily locate feedback by searching for a specific user's name.
* **Filters:** Use filters to view comments from specific user groups, such as referring providers, consulting providers, or patients.

### **Understanding Feedback**

Admins can review feedback to gain insights into user preferences and concerns:

* Identify areas of satisfaction: Understand what users like about the platform.
* Address concerns: Take note of any dislikes or issues raised by users to address them effectively.
* Continuous improvement: Use feedback to enhance platform features and usability, ensuring a positive user experience.

<figure><img src="/files/KbUA5t4dMZbUG1TRFrOS" alt=""><figcaption><p>Feedback</p></figcaption></figure>


# User Activity

Admin can track and analyze user actions across the platform efficiently.

### Overview

The User Activity section within the admin panel serves as a comprehensive record keeper, providing insights into the actions performed by users across the platform.

### **Recorded Activities**

* **Action Tracking**: The module records various actions taken by users, including logging in, scheduling appointments, updating profiles, and more.
* **Timestamps**: Each action is timestamped with the date and time it occurred, providing a chronological view of user activity.
* **Location Details**: User activity logs also include the location based on the user's IP address, offering insights into user engagement across different regions.
* **User Type Identification**: Users are categorized based on their role, such as referring provider, consulting provider, patient, or admin.
* **User Identification**: The name of the user associated with each action is recorded, facilitating accountability and tracking.

<figure><img src="/files/r9b1YxxcIcC4IwhoTCVq" alt=""><figcaption><p>User Activity</p></figcaption></figure>

### **Search and Filter Functionality**

* **Keyword Search**: Utilize the search bar to enter keywords related to specific actions or user names, enabling quick retrieval of relevant activity logs.
* **Filtering Options**: Admins can filter user activity data based on clinics, users, and activity dates, allowing for focused analysis and monitoring.


# Configuration

In this section admin will configure their platform settings such as appearance, services, clinics, customized documents.


# Services

On this page admin can efficiently manage and categorize clinic services for patient accessibility.

### Service Management

Service Management helps clinics and hospitals ensure patients get the right medical care they need quickly.

Admins create and categorize services, making it easy for patients to find the care they require.

### **Service List**

View the list of service displayed, encompassing service image, service names, service type, Min price , max price, cancellation fee platform fee and Action.

<figure><img src="/files/khGhTCAvC8DXbrQsilCh" alt=""><figcaption><p>Services</p></figcaption></figure>

1. **Service Image** : In this column, it contains the image of the services
2. **Service Name:** It shows the name of the service
3. **Service Type:** It shows the type of service such as insurance covered or paid covered.
4. **Min price:** It contains the minimum price where the admin can set the minimum price of taking the service.
5. **Max Price:** It contains the maximum price where the admin can set the maximum price of taking the service.
6. **Cancellation Fee:** It shows the cancellation fees. Admin can set the cancellation fees when an appointment will get cancelled.
7. **Platform Fee:** It shows the platform fees. Admin can set the platform fees during the signup as users
8. **Active/Inactive**: It is a toggle button where the admin can active/inactive the service. If the service is off then the service is not visible to the providers and patient are not accessible to that service. If the service is on then the service is accessible to all users.
9. **Action:** Two types of action admin can access.
   1. **Edit:** Through the edit icon admin can edit the service details as needed.
   2. **Assignee Clinic:**&#x20;

      Admins assign services to clinics, a task reserved for super admins. They can toggle various features:

      * **Auto Approval:** Automatically confirms appointments if online booking is enabled.
      * **Online Booking:** Allows patients to schedule appointments online for the service.
      * **Select Provider:** Enables patients to choose specific healthcare providers.
      * **Enable Rebooking:** Facilitates easy appointment rescheduling for patients.

      <figure><img src="/files/HKwFrGmQsd7I5Gi1E9od" alt=""><figcaption><p>Assign Clinic</p></figcaption></figure>

### **Filtering and Search**

Admin can conveniently search for services by name. Admins can filter services based on clinic service type.

### **Add Service**

Admins can add services directly from the admin panel. They complete essential fields such as:

<figure><img src="/files/3SpJov2vPgNxVXapmkZN" alt=""><figcaption><p>Add service</p></figcaption></figure>

1. **Service type:** Whether the service type is insurance covered or paid covered.
2. **Service Name:** Clearly identifies the service.
3. **Symptom:** Describes the symptoms or conditions the service addresses.
4. **Image:** Provides visual representation.
5. **Description:** Offers detailed information about the service. Admins can also choose whether to display service details to referring providers.
6. **Visible to external service provider toggle**: If you enable the toggle referring provider will be available for this toggle. If you disable the toggle, the service is not visible to the referring provider.
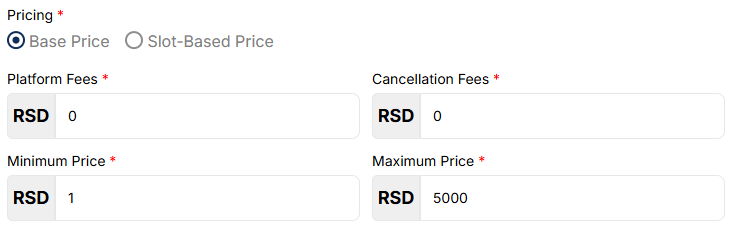
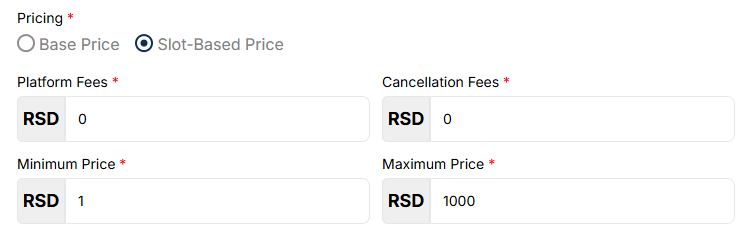
7. **Pricing:** There are two options base price and slot-based price.
   1. **Base Price:** If you enable the base price for this service consulting provider will enter the fees.
   2. **Slot-Based Price:** If you enable the slot base price for the service consulting provider enter the fees in 15 minutes, 30 minutes, 45 minutes and 1 hour.
8. Then set the minimum price, maximum price, cancellation fees, and platform fees


# Clinic

In this page admin can manage clinics efficiently: add, edit, activate/deactivate, and set default clinics

### Clinic Management

In the Clinic Management section, admin have the ability to oversee and manage all aspects related to clinics within the system.

<figure><img src="/files/0V83ekPfJKrtHsz6SDUC" alt=""><figcaption><p>Clinic List </p></figcaption></figure>

### Clinic Management Overview

The details of clinic that are displayed in an Admin Panel are listed below:

* **Clinic Name:** This section shows the name of the clinic.
* **Clinic Domain:** This section shows the name of the clinic domain.
* **Client Name:** This section shows the name of the client
* **Contact Email:** This section show the contact email of that clinic
* **Contact Number:** This section show the contact number of that clinic
* **Default:**
  * Users, including patients and providers, must select a clinic during registration. If no clinic is chosen, the default clinic will be automatically assigned.
  * Ensure that one clinic is set as the default to streamline user registration.
* **Active/Deactivate:** Admin can activate or deactivate clinics based on various factors. This functionality allows for efficient management of clinics, ensuring that only active clinics are accessible to users within the system.
* **Action:** This section has one buttons which are mentioned below with their functions:
  * **Edit:** This button is used by an Admin to update the details of the clinic.

### **Adding a Clinic**

* Click on the "Add Clinic" button to initiate the process of adding a new clinic.

<figure><img src="/files/PKkr8o65z7Jzk2cogUbl" alt=""><figcaption><p>Add Clinic</p></figcaption></figure>

* Fill in the required details such as clinic name, domain, contact name, contact email, contact number, create password.

<figure><img src="/files/3dFtAdpG9XKdyZm5nniv" alt=""><figcaption><p>While adding the clinic 1 stepper page</p></figcaption></figure>

* Choose the theme color, Logo, enter the clinic address, Fax Number, <br>

<figure><img src="/files/kialziRPKOvkRBRSUWi0" alt=""><figcaption><p>While adding the clinic 2 stepper page</p></figcaption></figure>

* Once all necessary information is entered and click on the "Submit" button to add the new clinic to the system.


# Templates

Admin can create the template for the appointment notes by the service provider.

<figure><img src="/files/n7FUTp4KUqsutfA2RvF8" alt=""><figcaption><p>Template</p></figcaption></figure>

The listing will contain :&#x20;

1. **Sr no**: Counting of the template.
2. **Title:** Here it shows the title of the template.
3. **Created date:** On which date the template is created.
4. **Clinic Name**: For which clinic template is visible.
5. **Status:** The admin can turn on/off the template for the visibility of the clinics or providers of that clinic.
6. **Action:** The admin can edit or delete the template.


# Package

## Overview

The **Package** feature is designed for the management of service packages offered to patients. This allows admins to create, edit, and assign packages that include a set number of appointments and specific services, tailored to different clinics and patient needs.

<figure><img src="/files/A6O5s9Saixga2s2Umb5m" alt=""><figcaption><p>Package</p></figcaption></figure>

## Listing

* Admins can view all existing packages in a structured list format, which includes: Package Name, Included Services, Total Appointments, Validity Period, Pricing Details (Listed and Discounted)
* Admins can add new packages via the "**Add Package**" button.
* **Fields to Fill:**

  * **Package Name:** Unique identifier for the package.
  * **Services:** Selection of one or multiple services included.
  * **Total Appointments:** Number of appointments covered by the package.
  * **Validity:** Duration for completing the package, specified in days.
  * **Pricing:**
    * **Listed Price:** Standard price for the package.
    * **Discount Price (Optional):** Displayed to patients if applicable.
  * **Clinic Assignment:** The admin can assign the package to multiple clinics.

  <figure><img src="/files/BFLtgaxI4QGK1e0VkDa5" alt=""><figcaption><p>Add Package</p></figcaption></figure>
* **Action:** Edit and delete

## **Search and Filter**&#x20;

* Admins can efficiently find specific packages using a search bar and filter options based on client names or services.


# Feature Control

Admin will control the feature such as referral, article, mood, goal and diary.

<figure><img src="/files/p20IJ3DbQQy61986K4qw" alt=""><figcaption><p>Feature control</p></figcaption></figure>

## Referral

* Enable or disable the Referral Flow toggle to control whether the referral process is required in the system.
* Enable or disable the Patients Referral Request toggle to allow or restrict patients from requesting referrals.

<figure><img src="/files/F5kyQIaXj24YEdRxjmW2" alt=""><figcaption><p>Referral</p></figcaption></figure>


# Customize Document

### Overview

Admin can add the Company Name, Logo, Footer Logo, Digital Signature, Footer Content and Address which will be fetched by the system on every document of the Admin like Email, Transaction, Prescription, etc.<br>

<figure><img src="/files/8a1SmHSPgwooim6rm0NH" alt=""><figcaption><p>Customize Document</p></figcaption></figure>

### Customize Document Instructions <a href="#customize-document-instructions" id="customize-document-instructions"></a>

1. Click "Edit" to update the details of this tab.
2. The company name entered by you while onboarding will be there by default.
   1. You can change it as per your preference.
3. You can upload your company logo which will be reflected on the document shared with the employer or candidate.
4. Upload the "Footer Logo" and "Signature" that will be reflected at the bottom of the shared document.
5. Add "Footer Content" and "Address" in your document.
6. Click "Save".

The next page will help you to customize the appearance of the platform.


# Appearance

This page will guide to set your appearance for your platform

### Overview

This section of the Settings module will be used to improve the user interface of the Admin Panel.

Establish a distinct online identity with:

* Branding through logo upload.
* Different themes.
* Custom footer content for a consistent appearance.
* Custom favicon for a unique online presence.
* Unique clinic descriptions and names.

<figure><img src="/files/YmaIBOLqzeeKXXe7JDGS" alt=""><figcaption><p>Appearance </p></figcaption></figure>

### Appearance Introduction

1. Click "Edit" to update the fields of "Appearance".
2. By default: The default theme is selected. If you want to change any field you have to choose the Custom field.
3. The company name entered by you while onboarding will be there by default.
   * You can change it as per your preference.
4. Enter the description of your company.
5. Enter "Copyright Text".
6. Select the colour, that will be applied on the Admin and User Panel.
7. Select a different colour from the colour picker according to your company theme.\
   \\

   <figure><img src="/files/BEF7Qvpasee5uOAtjpL9" alt=""><figcaption><p>Color Picker for Apperance</p></figcaption></figure>
8. Upload "Logo", "Favicon" and "Footer Logo".
9. Select the font of your choice.<br>

   <figure><img src="/files/a2A6MKReZQbyi8pOUlRq" alt=""><figcaption><p>Select Font</p></figcaption></figure>
10. Click "Save".


# Master

Admin can manage master fields and subfields efficiently.

### Overview

The Master Management section empowers administrators to customize and manage master fields and subfields, facilitating efficient data organization within the system.

<figure><img src="/files/lGUmuJsnJAb2w8PAaTIk" alt=""><figcaption><p>Master Section</p></figcaption></figure>

### **Adding a Master Field**

1. Click on the "Add Master" button.
2. Enter the name of the master field.
3. Optionally, add subfields by clicking on "Add Subfield" and entering the subfield name.
4. Click "Save" to create the master field.

### **Editing a Master Field**

1. Find the desired master field from the list.
2. Click on "Edit" or "Modify" next to the master field.
3. Update the name or associated codes as needed.
4. Optionally, edit or modify associated subfields.
5. Click "Save" to update the master field.

### **Deleting a Master Field**

1. Locate the master field to delete.
2. Click on "Delete" or "Remove" next to the field.
3. Confirm deletion when prompted.

### **Activating or Deactivating a Master Field**

1. Find the desired field from the list.
2. Toggle the activation status using the provided option (e.g., "Active" or "Inactive").
3. Save changes to update the activation status.


# Permission

In this section admin controls user access and tasks based on assigned roles efficiently.

### Overview

The Permission Management section in the admin panel acts as a central hub for controlling user access and tasks based on their roles.

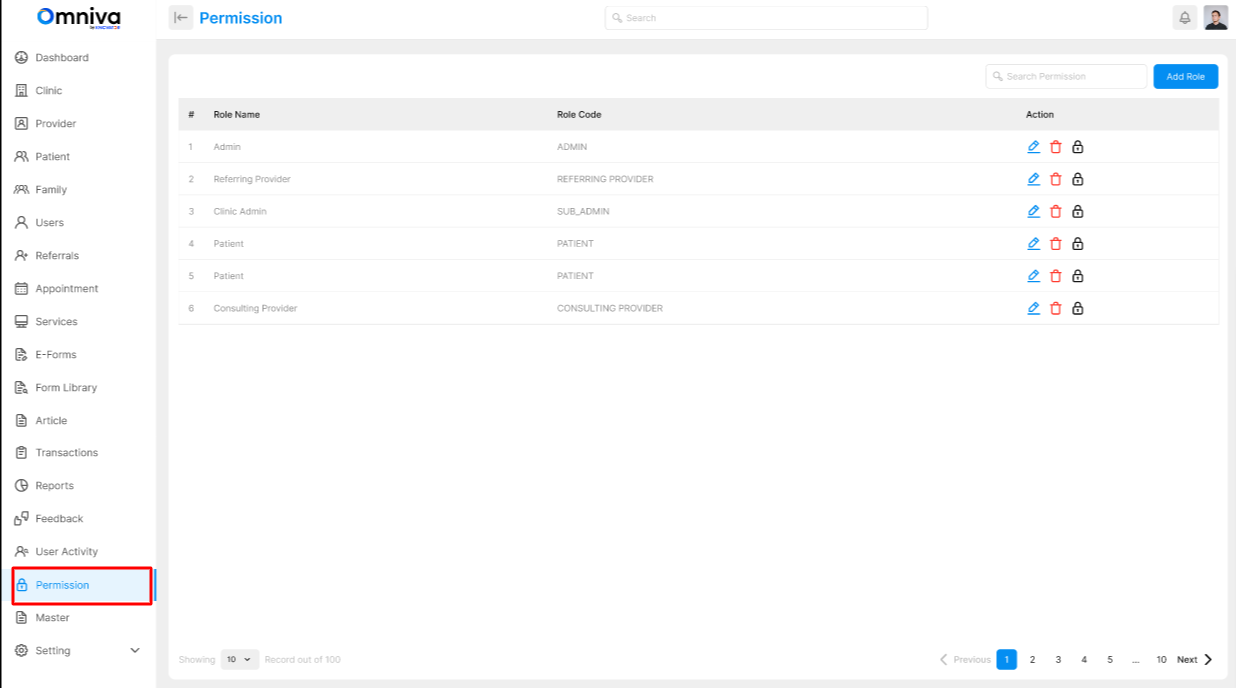
<figure><img src="/files/2J0vIybVTA5QmoHQdxat" alt=""><figcaption><p>Permission Section</p></figcaption></figure>

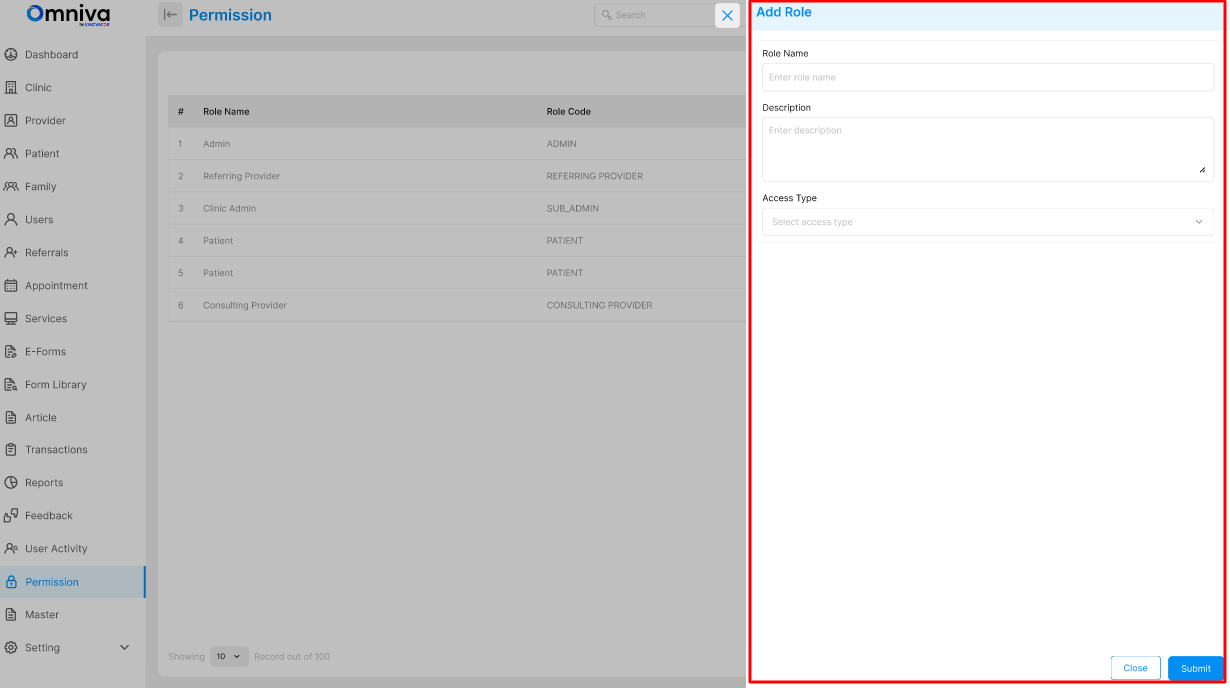
### Add role

* For creating the role you have to fill the details such as role name, description, role access(whether it is front, or admin role).
* In front role there are consulting provider, referring provider, patient.
* In admin role there are super admin, clinic admin, support staff.

<figure><img src="/files/bZPyQK5JHgjbiTcOGcQj" alt=""><figcaption><p>Add role</p></figcaption></figure>


# Platform Configuration

Here in this page admin will configure the platform

It will contain several tabs such as email configuration, payment configuration, meeting and preferences.

## Email Configuration

* Using this feature an Admin can configure the email through which an Admin user, Service provider or a Patient will receive email.
* The admin can configure the email so that the receiver will receive the email from the preferred email address of the admin.
* Admin has to fill in the following details to configure the Email address so that the receiver will get the email from the Admin's preferred email address i.e., Email Provider, From Email, Client Id, Client Secret, Region.

## Payment Configuration

* Customize payment with the specific clinic needs of the system.
* For the payment admin has to choose stripe or razorpay.

### Payment Instruction

1. Click on  "Edit" button&#x20;
2. Select the Payment Provider  stripe and Razorpay
3. If you select the stripe, this field you can enter
   1. Enter Stripe Public Key&#x20;
   2. Enter the Stripe Private Key
4. If you select the Razorpay, this field you have to enter
   1. Enter the Key ID&#x20;
   2. Enter the Secret Key
5. Click on "Update"

[Refer to Stripe Integration](/overview/stripe-integration)

<figure><img src="/files/RIUIQKK9MYgM9fk7OO0y" alt=""><figcaption><p>Payment</p></figcaption></figure>

## Meeting Configuration

* In the **Meeting Configuration** tab, admins can set up the platform's video call functionality by selecting the meeting type and providing the necessary credentials. The platform supports two types of meetings: Vonage Meeting and SDK Meeting.&#x20;
* Both Vonage Meeting and SDK Meeting enable video call functionality for the platform.

### Meeting Configuration Instruction

1. Click on the "Edit " button of Meeting Configuration.
2. You will see options for **Vonage Meeting** and **SDK Meeting**.

   If you select **Vonage Meeting**, you will be enter the following details:

   * **Vonage Secret Key**
   * **Vonage API Key**
3. If you select **SDK Meeting**, you will be enter the following details:
   * **SDK Secret Key**
   * **SDK API Key**
4. Click on "Update".

<figure><img src="/files/Qla7MIyDZwZe6FtFojJH" alt=""><figcaption><p>Meeting</p></figcaption></figure>

## Preferences

* In this tab, admin sets the Appointment Expiration hour if the Service provider does not accept the appointment, that appointment will be considered as the cancel the appointment.&#x20;
* The Google Address API Key is a credential used to authenticate requests to Google Maps APIs.
* As an admin, you have the ability to configure the Session Inactivity Time for users on the platform.
* Session Inactivity Time is a period of time that determines how long a user can remain inactive on the platform before being prompted to take action. If a user does not interact with the platform within this specified duration, a pop-up screen will appear.

### Preference Instruction

1. Click "Edit" to update the fields of "Preferences".
2. Adjust "Appointment Expiration Hour".
3. Enter the "Google address API key".
4. Mention the "Session Inactivity Time".
5. Click "Update".

<figure><img src="/files/YjwHH0WOMIUA7ltYu3wk" alt=""><figcaption><p>Preference</p></figcaption></figure>

### **Currency**

1. Admin can set the currency at one time.
2. Option to choose the INR, CAD and USD.
3. So admin will update the currency of the whole platform.

<figure><img src="/files/i9In4MKYL0ely3LTMA8X" alt=""><figcaption><p>Currency</p></figcaption></figure>

### Fax

1. Admin will be able and disable the fax throughout the system.
2. If the admin allows the fax, the provider and admin will send the patient note through the Fax.
3. If admin all


# Service & Provider Pricing

## **How do consultation fees work? Base Price vs Slot-Based Pricing**

In Omniva, pricing is tied to **both the service configuration** (whether it is set to *Base Price* or *Slot-Based Price*) **and the provider’s availability** (slot duration of 10, 20, 30 minutes, etc.).

There are **two pricing models**:

***

### 1. Base Pricing

Base Pricing means the service has a **single consultation fee**, which is then proportionally split across the slot duration defined in provider availability.

<figure><img src="/files/bTW2lM9xlpQzf5aqkKoy" alt=""><figcaption></figcaption></figure>

#### Service Setup:

* Service requires:
  * **Min Price, Max Price**
  * **Platform Fee**
  * **Cancellation Fee**

#### Provider Setup:

* When creating or updating their profile, the system asks for:
  * **Single consultation price**
  * **Follow-up consultation price**
* Omniva automatically **splits this consultation price based on slot duration**.
* Patients see a **per-slot amount**, not the full consultation price.

<figure><img src="/files/91tVF1B0362xTknZOpwG" alt=""><figcaption></figcaption></figure>

#### Example:

* Provider sets Consultation Price = **RSD 100**.
* Provider availability: **10 min slots**.
* Patient books 1 slot → sees **RSD 10** as service fee.
* If the provider sets 30-minute slots → patient books 1 slot → sees **RSD 30**.

**Use Case:**

* Standard consultations where **pricing is split proportionally** across time slots.
* Keeps things consistent when providers only want to manage **one global consultation fee**.

### 2. Slot-Based Pricing

Slot-Based Pricing means the service fee is **defined separately for each slot duration** (10, 20, 30 min, etc.) and is not auto-split.

<figure><img src="/files/WXKUDY8eNMrIYH6o5kgX" alt=""><figcaption></figcaption></figure>

#### Service Setup:

* Service requires:
  * **Min Price, Max Price**
  * **Platform Fee**
  * **Cancellation Fee**

#### Provider Setup:

* When creating or updating their profile, the system asks for:
  * Different slot pricing for each available duration (e.g., 10 min, 20 min, 30 min).
* Patients see the exact slot-based fee the provider set.

<figure><img src="/files/8j8jtLXkKBe3XQa9sbgA" alt=""><figcaption></figcaption></figure>

#### Example:

* Provider sets:
  * 10 min = RSD 1,000
  * 20 min = RSD 1,800
  * 30 min = RSD 2,500
* Availability = **20 min slots**.
* Patient books 1 slot → sees **RSD 1,800**.
* If provider updates availability to 30 min slots → patient booking = **RSD 2,500**.

**Use Case:**

* Flexible consultations where **time directly impacts cost**.
* Useful for specialists who want to charge **different rates for different session lengths**.

### Key Differences:

| Aspect                 | Base Pricing                                                              | Slot-Based Pricing                                                                 |
| ---------------------- | ------------------------------------------------------------------------- | ---------------------------------------------------------------------------------- |
| **Pricing Basis**      | One global consultation price → auto-split into slots                     | Each slot duration has its own price                                               |
| **Provider Input**     | Sets only single consultation + follow-up fee                             | Defines separate pricing for 10/20/30 min slots                                    |
| **Patient Experience** | Sees **split amount** (e.g., 100 RSD consultation → 10 min slot = 10 RSD) | Sees **direct price for that slot** (10 min = 1,000 RSD, 20 min = 1,800 RSD, etc.) |
| **Best For**           | Standardized consultations, simple setup                                  | Time-sensitive consultations, flexible pricing                                     |


# Switch Profile

Effortlessly transition between roles, from admin to provider or patient, with just a click on your profile icon.

### Overview&#x20;

The User Module in the super admin panel allows the management of all users, including admin users, providers, and patients. Super admins can assign and edit roles, with role selection being either single or multiple based on a toggle setting. The Permission Module includes a Single Selection toggle for roles, affecting how roles are assigned and displayed. Super admins can also delete roles, impacting user access and associated data.

Initially, when onboarded, users are super admins and can switch their profiles to admin, provider, and patient.

<figure><img src="/files/uH1IHlNih0RStqqXPoZR" alt=""><figcaption><p>Switch Profile</p></figcaption></figure>

### Instructions for Super Admin

**Accessing and Managing User Roles**

1. **Navigate to the User Module**:
   * Open the super admin panel.
   * Click on the "User Module" to view all users.
2. **Editing User Roles**:
   * Select a user to edit.
   * Assign roles using the multi-selection field (e.g., super admin, clinic admin, support staff, etc.).
   * Use the Single Selection toggle to control whether multiple roles can be assigned simultaneously.
3. **Deleting User Roles**:
   * Select a user and click "Edit."
   * Remove the desired role.
   * Click "Update" to apply changes.
   * Confirm role deletion in the pop-up: “Are you sure you want to remove this role from the user's profile?”
     * **Confirm**: The role is removed.
     * **Cancel**: The role remains assigned.

### **Super Admin Role-Specific Changes**

1. **Removing Consulting Provider Role**:
   * Ensure all pending or upcoming appointments are canceled before confirming role removal.
   * All consulting provider data will be deleted from the provider sections of super admin, clinic admin, and support staff.
2. **Removing Referring Provider Role**:
   * If any referral is pending, it will be moved to the canceled status.
   * The user profile is deleted from the provider section of super admin, clinic admin, and support staff.
3. **Removing Patient Role**:
   * All patient data, including upcoming appointments and referrals, will be canceled and removed from the system.
   * The user profile will be deleted from the patient and family sections of super admin, clinic admin, and support staff.
4. **Handling Role Deletions with Multiple Assignments**:
   * When deleting a role, ensure to manage dependencies like appointments and referrals to prevent data inconsistency.
   * Confirm deletion carefully to avoid unintended data loss.


# Settings

In this section, admin configure system settings for seamless communication and compliance management.

### Overview

In the settings section, where you can configure essential aspects of the system to suit your needs. From managing referrals to customizing documents, this module empowers you to tailor the platform according to your preferences, ensuring seamless communication, compliance, and user experience.

Let's see all the tabs of setting in brief. Click "Next" to continue.


# Referral

### Overview&#x20;

* Enable or disable the Referral Flow toggle to control whether the referral process is required in the system.
* Enable or disable the Patients Referral Request toggle to allow or restrict patients from requesting referrals.

<figure><img src="/files/roWkV6vqsJTOyIXfcbKg" alt=""><figcaption><p>Referral</p></figcaption></figure>

### Functionality&#x20;

* **Toggle "On":**
  * Allows patients to request a referral flow for the system.
* **Toggle "Off":**
  * Restricts patients from requesting a system referral if their individual referral flow toggle is turned off.

**Patient-Affiliated Referral Flow Toggle:**

* **Toggle "On":**
  * Enables the referral flow within this module.
  * Both patients and doctors can leverage the referral system.
* **Toggle "Off":**
  * Disables the referral flow within this module.
  * Neither patients nor doctors can access the referral system.

The next page will guide you through entering clinic-specific FAQ details.


# FAQs

### Overview

* Search by the clinic name and FAQs.
* Add new FAQs by entering the question and its corresponding answer.
* List of all FAQs where admin can view, edit or delete the FAQs
* Edit existing FAQs as needed to tailor them to the specific requirements of the system.<br>

  <figure><img src="/files/S6Q7iByZIHrlXPv9WIoF" alt=""><figcaption><p>FAQs</p></figcaption></figure>

The next page will help you to enter the details of Terms and Condition and Privacy Policy pages of the platform.


# Pages

### Overview

Access the Pages section within the Settings module.

<figure><img src="/files/VThgcyBX7T5qS3TuDC1N" alt=""><figcaption><p>Pages</p></figcaption></figure>

The next page will help you establish the platform's Email Configuration.<br>


# Email Configuration

### Overview&#x20;

1. Using this feature an Admin can configure the email through which an Admin user, Service provider or a Patient will receive email.
2. The admin can configure the email in a way that the receiver will receive the email from the preferred email address of the Admin.
3. Admin has to fill in the following details to configure the Email address so that the receiver will get the email from the Admin's preferred email address i.e., Email Provider, From Email, Client Id, Client Secret, Region.

<figure><img src="/files/2KF2Re8iaWj6YbeJTCtj" alt=""><figcaption><p>Email Configuration</p></figcaption></figure>

The next page will help you establish the platform's Payment Configuration.


# Payment Configuration

### Overview

* Customize payment with the specific clinic needs of the system.
* For the payment admin has to enter the stripe public key and stripe private key.<br>

  <figure><img src="/files/T62u1zik6DmKqKsXSx4X" alt=""><figcaption><p>Payment Configuration</p></figcaption></figure>

### Payment Instruction

1. Click on  "Edit" button&#x20;
2. Enter the Payment Provider
3. Enter Stripe Public Key
4. Enter the Stripe Private Key
5. Click on "Save"

[Refer to Stripe Integration](/overview/stripe-integration)

The next page will help you establish the Meeting Configuration for the platform.


# Meeting Configuration

### Overview&#x20;

In the **Meeting Configuration** tab, admins can set up the platform's video call functionality by selecting the meeting type and providing the necessary credentials. The platform supports two types of meetings: Vonage Meeting and SDK Meeting.&#x20;

Both Vonage Meeting and SDK Meeting enable video call functionality for the platform.<br>

<figure><img src="/files/JFvOt9VICKV626yBYItw" alt=""><figcaption><p>Meeting Configuration</p></figcaption></figure>

### Meeting Configuration Instruction

1. Click on the "Edit " button of Meeting Configuration.
2. You will see options for **Vonage Meeting** and **SDK Meeting**.

   If you select **Vonage Meeting**, you will be enter the following details:

   * **Vonage Secret Key**
   * **Vonage API Key**
3. If you select **SDK Meeting**, you will be enter the following details:
   * **SDK Secret Key**
   * **SDK API Key**
4. Click on "Save".

The next page will help you to customize the documents of the platform.


# Preferences

### Overview

In this tab, admin sets the Appointment Expiration hour if the Service provider does not accept the appointment, that appointment will be considered as the cancel the appointment.&#x20;

The Google Address API Key is a credential used to authenticate requests to Google Maps APIs.

As an admin, you have the ability to configure the Session Inactivity Time for users on the platform.

Session Inactivity Time is a period of time that determines how long a user can remain inactive on the platform before being prompted to take action. If a user does not interact with the platform within this specified duration, a pop-up screen will appear.

### Preference Instruction

1. Click "Edit" to update the fields of "Preferences".
2. Adjust "Appointment Expiration Hour".
3. Enter the "Google address API key".
4. Mention the "Session Inactivity Time".
5. Click "Save".


# Dashboard

In Dashboard section: View appointments, referrals, and take quick actions.

After logging in as a consulting provider, access your dashboard for appointment and referral status. Take quick actions like making referrals and updating availability, and find answers in the FAQs section.

<figure><img src="/files/PJgWXUxVndwbweHqNCGk" alt=""><figcaption><p>Dasboard</p></figcaption></figure>

### Appointment Status&#x20;

Here, you'll find details on appointment status:

1. **Request Updates Count:** Shows pending referral requests.
2. **Completed Request Count**: Displays successfully completed referral requests.
3. **Upcoming Appointments:** Highlights scheduled appointments.
4. **Followup Appointments:** Indicates ongoing patient care appointments.

### Quick Action&#x20;

1. **Make a Referral:** Initiate patient referrals for specialized care.
2. **Set Availability**: Update and communicate appointment availability promptly.
3. **FAQs:** Access quick answers to common questions for assistance.

   <br>


# Patient List

Service provider can access patient records, appointments, and care details for comprehensive management.

### Overview

In the patient section, you can access patient records, appointments, and care details. Review demographics, appointments, documents, notes, mood, goals, diary entries, and e-forms for comprehensive patient management.

<figure><img src="/files/4pCU33SRQu0SHfgFeOcz" alt=""><figcaption><p>Patient List</p></figcaption></figure>

### Patient List

Access a record of patients scheduled for appointments or under your care.&#x20;

Click on a specific patient to view detailed information. Here, you will find the different tab.

<figure><img src="/files/xN5I1PGQxWadhq5H5q68" alt=""><figcaption><p>On specific click</p></figcaption></figure>

**Demographic Tab:**

* Displays date of birth and last visit.
* Patient's Details include parent's name, contact, and preferred name.
* Medical History lists medications, allergies, vaccinations, height, weight, and blood pressure logs.

**Appointment Tab:**

* View all appointments, including past, upcoming, and follow-ups.
* You can click on individual appointments to access detailed information and download appointment summaries for reference or documentation purposes.

**Document Tab:**

* Access documents related to the patient's medical history, treatment plans, or diagnostic reports and add new ones.
* Download patient history and specific documents.

**Notes Tab:**

* Consulting providers can attach prescriptions or download existing prescriptions related to the patient's treatment

**Invite Link Tab:**

* This tab shows any follow-up links sent by doctors or healthcare providers for scheduling additional appointments or follow-up consultations.

**Mood Tab:**

* View weekly mood and history, apply filters for diagnosis.

**Goal Tab:**

* Monitor patient's goal progress.

**Diary Tab:**

* Access patient's diary entries and notes.

**E-Form Tab:**

* This tab allows consulting providers to track the completion status of E-form assigned to the patient


# Appointment

Service provider track and manage appointments through various stages for efficient scheduling.

Overview

The Appointments section provides an overview of scheduled appointments for healthcare providers. When you are navigating into the appointment section you find different statuses of appointments.

<figure><img src="/files/EvJEK0zkgQnCL7GaqOFi" alt=""><figcaption><p>Appointment section</p></figcaption></figure>

Under the appointment tab, there are five other tabs:&#x20;

1. Referring
2. Pending
3. Upcoming
4. Completed
5. Cancelled

Let's visit the next page for more information and the functionality of these tabs ->&#x20;


# Referring

View and manage referrals, track referral status, and access related patient details.

## Overview

<figure><img src="/files/BPW3sLsapd3fA4mYiEWd" alt=""><figcaption><p>Referring Tab</p></figcaption></figure>

* This status indicates that a patient has been recommended for an appointment by another doctor.
* The patient's basic information is visible, indicating they are in the referral stage.
* Appointment details might not be confirmed yet, as it awaits approval.


# Pending Appointments

View and manage pending appointments, confirm or approve them, and associate with the relevant case number.

## Overview

<figure><img src="/files/bf1o6Wzd95IszcQCqR8H" alt=""><figcaption><p>Pending tab</p></figcaption></figure>

* In the Pending Appointments tab, you will see a list of appointments awaiting confirmation.
* Patient information, including name and contact details, will be visible, along with specific appointment details such as date and time.
* Under the **Pending Tab** of appointments, the provider can:
  * See a **dropdown** of the list of patients with cases tied to the same clinic and provider.
  * Change the case number before approving an appointment. Once a case number is selected and the appointment is approved, it is moved under that case.
* To approve an appointment, click on the "Approve" button next to the appointment details.
  * If approved, the appointment will move to the Upcoming section, and the patient will be notified of the confirmation.

<figure><img src="/files/oLLPK7vFVKlvXtxUyczC" alt=""><figcaption><p>Approve appointment</p></figcaption></figure>

* To decline an appointment, click on the "Decline" button next to the appointment details.

  * If declined, the appointment will move to the Cancelled section, and the patient will be notified of the cancellation.

  <figure><img src="/files/bWihiq6Qb8dFoUkLuY9E" alt=""><figcaption><p>Decline appointment</p></figcaption></figure>


# Your Upcoming Appointments

Access details of your next appointment and manage action

## Overview

* The appointment is confirmed and scheduled to happen soon, indicating the patient is set to see the healthcare provider.
* Patient information is prominently displayed, along with confirmed details of the upcoming appointment.
* All finalized details, including date, and time are visible.
* If needed, consulting providers can reschedule or cancel appointments directly from the appointment details screen.

<figure><img src="/files/qELQzDEZu8mfPNUzXOjp" alt=""><figcaption><p>Upcoming Tab</p></figcaption></figure>

## User Actions for Managing Appointments:

1. **Join the video call:**

   1. **Access Your Call**: Simply click on the scheduled appointment to join.
   2. **When to Join**: Be ready! You can enter the call up to **10 minutes before** your scheduled time.
   3. **Features You Can Use During the Call:** Use camera/mic control, screen sharing, appointment details, notes, prescriptions, and lab/radiology notes for collaboration. For more details,[ visit here.](https://app.gitbook.com/o/yCmyE3hFyolSGBXaxT9T/s/QbmSVGziFCVxttjnOvMC/~/changes/30/consulting-provider/appointment/upcoming/during-call)

   <figure><img src="/files/ZErijn0OL3X3nI5WKNLu" alt=""><figcaption><p>During Call Screen</p></figcaption></figure>
2. **Reschedule the appointment**
   1. Users can reschedule the booked appointment before 24 hours of a scheduled appointment.
   2. Otherwise, within 24 hours, the rescheduled icon is hidden.
3. **Cancel the appointment**
   1. Users can cancel the appointment at any time. But they can cancel the appointment before 24 hours, the cancellation charge will not be charged to the patient. However if they can cancel the appointment within 24 hours of the scheduled appointment, the patient has to pay a penalty for the appointment.
4. **Chat with the provider**

   1. Patients and providers can chat and share media (images, documents, PDFs, and links) up to 48 hours before the scheduled time.
   2. **Read-Only Mode:** If an appointment is cancelled, the chat becomes read-only. Users can view past messages but cannot send new ones or attachments.
   3. **Notifications:** Real-time alerts for new text messages, images, documents, and links include direct access to the chat.

   <br>

   <figure><img src="/files/VoArwfntTk4PtwF6vPH7" alt=""><figcaption><p>Chat Before appointment</p></figcaption></figure>
5. **Invite another user before the call**

   1. Enter the **email address** of the person you wish to invite.&#x20;
   2. **Send the Invitation**:\
      Click **Update** to share the invite link with the selected participant.
   3. **Participant Joins**:\
      The invited user will receive the link and can join the call by clicking on it.\\

   <figure><img src="/files/tUxwgFiKaSWgNvsU315C" alt=""><figcaption><p>Invite User</p></figcaption></figure>


# Available Features During the Video Call

Overview of key video call features, including notes, prescriptions, participant invites, and post-call actions

## Key Features During Your Video Call

1. **Camera and Mic Control**\
   Easily turn your **camera** and **mic** on or off to suit your preferences during the call.
2. **Screen Sharing**\
   Share your **screen**, **window**, or **tab** to collaborate seamlessly with the patient or provider.
3. **Change Layout**\
   Use the **layout icon** to customize the screen’s appearance, ensuring maximum comfort and focus during the call.
4. **Appointment Details**\
   Tap the **"View Appointment Information"** button to access detailed information about the **patient.**<br>

   <figure><img src="/files/kV2Wo7rG00GgUYRiiy19" alt=""><figcaption><p>Appointment Information</p></figcaption></figure>
5. **Chat:** Chat remains available throughout the appointment, allowing real-time communication.<br>

   <figure><img src="/files/nUXUlKYm8ZdikRtL239D" alt=""><figcaption><p>Chat During call</p></figcaption></figure>
6. **Notes Section**\
   The **Notes Section** has four  parts:
   1. **Diagnosis:** Searchable and selectable from a dropdown menu.
   2. **Patient Note**: Contains fields such as **Medical History**, **Tell Your Story**, and **Allergies**. These fields are customizable from the admin section.
   3. **Doctor Note**: Includes **consultation notes** from the provider. You can add more fields, which are also customizable.
   4. **Appointment Notes**: Use this section to add **notes** for the patient related to their appointment. Select the template for easier use. These notes will also appear in the patient’s appointment summary PDF.<br>

      <figure><img src="/files/WqaCMqEKLdRJBPZKnZWo" alt=""><figcaption><p>Notes</p></figcaption></figure>
7. **Prescription**\
   Prescribe for the patient in the following format:
   1. **Medicine Name: Search and select the medicine name**
   2. **Frequency** (e.g., 1-0-1)
   3. **Timing** (e.g., after a meal, before meal)
   4. **Duration** (e.g., 1 day, 1 month, 1 year)
   5. Add any **additional information** as needed.<br>

      <figure><img src="/files/U0qADjQFYcDHCld7H7jV" alt=""><figcaption><p>Prescription</p></figcaption></figure>
8. **Test**

   1. Lab Note\
      Search and select **lab tests**, and they will be added to the list in the queue for processing.
   2. **Radiology Note**\
      Similar to the radiology test, **radiology tests** can be searched and added to the queue for further action.

   <figure><img src="/files/omyKyM7wFAuV546NxPcR" alt=""><figcaption><p>Add the Test</p></figcaption></figure>
9. **Invite Other Participants:**&#x20;

   1. During the video call, look for the **"Invite Participant"** button or icon in the call interface.
   2. **Add Participant Details**:
      1. Enter the **email address** of the person you want to invite.
      2. **Send the Invitation**:\
         Click **Update** to share the invite link with the selected participant.
      3. **Participant Joins**:\
         The invited user will receive the link and can join the call by clicking it.

   <figure><img src="/files/VEuf25d1TInHWwCNlw2o" alt=""><figcaption><p>Invite Users</p></figcaption></figure>

## Post-Call Actions

After ending the call, you'll be directed to the **Summary Page**, where you can modify, edit, or delete any information entered during the call.\
You will also be prompted to **mandate the provider's signature** for confirmation.

Additionally, you can:

* Attach any necessary documents.
* Send a **follow-up link** to the patient with further instructions or information.
* Set **reminders** for patients to follow up on specific tasks or appointments.

For more information about the **Completed Tab**, simply click on the **next page**.


# Completed Appointments

View completed appointments, chat history, appointment details, and download relevant documents like summaries and prescriptions.

## Overview

Completed appointments are those that have successfully occurred, either as a referral or appointment. All appointments marked as **completed** will be listed in the **Completed Tab**. You can view patient details, including summaries from the completed appointment. Appointment information such as date, time, and relevant notes are accessible through the appointment summary.

<figure><img src="/files/rjOmfuU61sSxtBBuRNry" alt=""><figcaption><p>Completed</p></figcaption></figure>

## Actions in the Completed Tab:

* **Chat**: You can chat with the patient for up to **3 more days** after the appointment. After this period, you can only view previous chat history.<br>

  <figure><img src="/files/VEtmZkOERGWGWBrftvI3" alt=""><figcaption><p>Click on Chat icon</p></figcaption></figure>
* **Eye Icon**: View detailed information about the appointment, including **appointment notes**, **prescriptions**, **lab notes**, **radiology notes**, and **referral details**.
* **Three Dots**: Access the **PDF** of the **appointment summary**, **prescription**, **lab notes**, and **radiology notes.**


# Cancelled Appointments

View cancelled appointments, including patient details and original appointment information.

### Canceled Tab&#x20;

<figure><img src="/files/ha9KsY6c1Jvnly4b9Tdk" alt=""><figcaption><p>Cancelled</p></figcaption></figure>

* The appointment has been cancelled, either by the patient or the healthcare provider, and will not proceed as scheduled.
* Patient information is retained, but there is an indication that the appointment has been cancelled.
* Details of the cancelled appointment, such as the original date and time, are present in the system


# Refer A Patient

Service provider can initiate patient referral process seamlessly with these essential steps.

### Overview

Referring a patient involves initiating the process of transferring their care to another healthcare provider or specialist, typically for further evaluation, diagnosis, or treatment.

<figure><img src="/files/Oy3A7ACjiexKvpFWOhlJ" alt=""><figcaption><p>Refer a Patient</p></figcaption></figure>

### Referring a patient, follow these steps:

1. **Patient Search**: Easily find patient information using their name.<br>

   <figure><img src="/files/jfb8NF8sv7fG3GHnhzaM" alt=""><figcaption><p>Patient Search</p></figcaption></figure>
2. **Choosing Specialty:** Select the appropriate treatment category and after that on next stepper, you can provide a reason for the referral.<br>

   <figure><img src="/files/OqBeKcd4MrXemXkGP5Uo" alt=""><figcaption><p>Choose specialty</p></figcaption></figure>
3. **Attachments:** Attach relevant documents to support the referral process.<br>

   <figure><img src="/files/QWXkGMLQPVfLF4o9b7oX" alt=""><figcaption><p>Add reason and attachment</p></figcaption></figure>
4. **Referral Verification:** Double-check referral details before submission.\ <br>

   <figure><img src="/files/YZ1m9bZgMjuLg8KCCHY4" alt=""><figcaption><p>Referral Verification</p></figcaption></figure>


# Availability

Effortlessly manage your availability for appointments.

### Overview

The **Availability** section allows you to configure your working hours, time slots, and break durations for each day of the week. You can also apply overrides for specific dates when your availability may differ from the standard schedule.

<figure><img src="/files/jtQUMx8w5Yi4LTzrYH1k" alt=""><figcaption><p>Availability</p></figcaption></figure>

### Manage Availability

1. **Accessing the Availability Section**
   1. On the left-side navigation menu, select the **Availability** tab under the **Account** section.
   2. The **Manage Availability** page will appear where you can customize your working hours and other related settings.
2. **Configuring Availability**

   **Step 1: Time Zone**

   1. At the top of the **Manage Availability** page, you'll find the **Time Zone** dropdown.
   2. Select the appropriate time zone for your location from the dropdown list.

   **Step 2: Slot Duration**

   1. Next to the time zone, select the desired **Slot Duration** in minutes (e.g., 15 minutes).
   2. This setting determines the duration of each available time slot for appointments.

   **Step 3: Break Duration**

   1. Use the **Break Duration** option to set the amount of time (in minutes) you want to allocate between appointments.
   2. You can adjust the break duration by using the plus (+) or minus (-) buttons.
3. **Setting Weekly Availability**

   **Step 1: Choose a Day**

   1. You will see a list of days (Sunday to Saturday) with toggle switches next to them.
   2. Toggle on the days on which you are available for appointments.

   **Step 2: Set Time Slots**

   1. For each day you toggle on, you can configure your availability as follows:
      1. **Start and End Times**: Use the time pickers to set your working hours for that day (e.g., 8:00 AM – 8:00 PM).
      2. **Slot Type**: Select the slot type (e.g., **Online**, **In-person**, or other options if available).
      3. **Add Multiple Slots**: If you wish to have multiple availability slots in one day, click the **plus (+)** button to add another time slot.

   **Step 3: Copy Schedule**

   1. The copy icon (clipboard symbol) allows you to copy the availability settings of a particular day to other days.
   2. Click the copy icon, then choose the day to which you want to apply the same schedule.
4. **Date Overrides**
   1. If you have special dates when your availability differs from the usual schedule, use the **Date Overrides** option.
   2. Click **Add an Override** on the right-hand side of the page.
   3. You can set specific dates and customize the available time slots for those particular dates.
5. **Saving Changes**
   1. Once you have configured your availability, all changes will automatically be saved, as indicated by the "Availabilities updated successfully" message in the top-right corner.

By following these steps, you can effectively manage your availability and ensure your appointment slots are correctly displayed to patients on the platform.


# Notification

Stay informed to service provider with alerts for appointments, referrals, and messages.

### Overview&#x20;

* Stay updated on appointments, referrals, and messages in the Notification section.&#x20;
* Receive alerts for upcoming appointments, follow-up appointments and new messages, ensuring you're informed about important events.
* If the patient doesn't join and the provider is unavailable, notifications will alert both parties to ensure awareness of the missed appointment or communication.

<figure><img src="/files/gf8PGjI6WnliMpApp2xQ" alt=""><figcaption><p>Notification Section</p></figcaption></figure>


# Transaction

View transaction history: completed, failed transactions

In the transaction section here you can see the list of all transaction history.

<figure><img src="/files/uTDxLN1UfMKcg2t3ZOI3" alt=""><figcaption><p>Transaction section </p></figcaption></figure>

1. In **all tab** here you see the completed, and failed transactions.
2. In **completed tab**, there is a list of successful transactions status visible.
3. In **failed tab**, there is a list of failed transactions is visible.

### Search and Filter Functionality

Patient can search by the name of the patient and filter by the date range.


# Specialty

View specialty list

### Overview

The **Specialty Section** in the side menu categorises and organizes various medical specialities, allowing patients to easily find providers based on their medical needs.

<figure><img src="/files/tPTO92DvxVMHLktpedv2" alt=""><figcaption><p>Speciality</p></figcaption></figure>

**Viewing Specialties**:

* It will contain the list of available specialities.
* **Action:** To edit and delete the specialities

**Searching for a Specialty**:

* Use the **search bar** at the top of the speciality list to type and quickly find a specific speciality.

**Adding a New Specialty**:

* Click the **Add Specialty** button, typically located at the top-right corner of the speciality page.
* Choose from the list of specialty
* Click **Save** to add the new speciality to the system.

<figure><img src="/files/1HefkyoRLjrbxG66S50P" alt=""><figcaption><p>Add speciality</p></figcaption></figure>


# Resources

In the Resources section, provider can access e-forms and articles.

Lets move into the E-form section.


# E-form

In this section, you will find the all forms related to that clinic.

### Overview

E-Forms will particularly facilitate organized information of patient before appointment. This can be used for multiple purposes like before and after appointment, consultation feedback etc.

In this section, you will find the all forms related to that clinic. You can share the e form to the patients.&#x20;

<figure><img src="/files/DH8VxEIojMxfRjtmgzSf" alt=""><figcaption></figcaption></figure>

### E-form List&#x20;

1. When you click on the name of article you will find the all patient list and see their statues such as pending, in progress, and complete and perform the action (view)<br>

   <figure><img src="/files/dnrNmEjrBDgWYOri4t6u" alt=""><figcaption><p>View all patient list</p></figcaption></figure>
2. Name of the e form on right side there is a share button icon you can click into this icon and then add the patient to the form.<br>

   <figure><img src="/files/i5T0bEjedbC8F03RDnTf" alt=""><figcaption><p>On clicking share icon</p></figcaption></figure>


# Article

In this section service provider find the list of articles which is related to that clinic. Here provider can filter and search based on articles name.

<figure><img src="/files/wWWGz41AFcqYJS5mP3sW" alt=""><figcaption></figcaption></figure>


# Case Management

This page provides an overview of the case management system, displaying case details, appointments, and service provider information.

## Overview

As a **service provider**, the goal is to manage patient cases effectively. You can view, approve, or decline appointments, change case numbers, and track appointment histories through the Case Management system.

* Navigate to the **"Case Management"** tab from the side menu, which displays all the ongoing cases associated with their patients across different clinics.

<figure><img src="/files/E7PEkKDGpOf9buB3yNhA" alt=""><figcaption><p>Case Management</p></figcaption></figure>

## Listing

The page will show a list of **cases** with the total number of appointments associated with each case.

**Case Card Details:** Each case card displays the following

* **Case ID**: Unique identifier for the case.
* **Total Appointments**: The total number of appointments tied to this case.
* **Last Appointment Details**:
  * **Consulting Provider Name**: The service provider handling the case.
  * **Appointment Date and Time**: e.g., “14 Sep 2024 | 10:00 AM.”
  * **Consultation Type**: Online or in-person.
  * **Service Tags**: Up to 4 services are shown, with more services displayed on hover (e.g., 5+).
  * **Appointment Note**: If the last appointment is completed, the note will be displayed. Otherwise, the field will remain blank.
* **Upcoming Appointment Details**: Displays the status of the next scheduled appointment.

## **Viewing Case Details**

* Clicking the card the user will be redirected to a detailed view of the selected case.
* In the detailed view, the admin can toggle between three tabs: **Appointments**, **Notes**, and **Follow-up Links**.
  * **Appointments Tab**: Lists all associated appointments categorized by status (upcoming, completed, or cancelled). If the provider changes the case number, the appointment will be moved under the selected case. If the provider does not change the case, the appointment stays under the initial case. Once approved, the case number becomes fixed, and further changes cannot be made.<br>

    <figure><img src="/files/RDHP75OoSKzWzqsZJLRY" alt=""><figcaption></figcaption></figure>
  * **Notes Tab**: Displays all notes attached to the patient by the service provider, organized by the appointment linked to this case.<br>

    <figure><img src="/files/7y4F18mTSZ4ouMj43hYA" alt=""><figcaption><p>Note</p></figcaption></figure>
  * **Follow-up Links Tab**: Displays follow-up links under the same case.


# Settings

Service provider update their profile, manage credentials, billing, deactivate account, change password.

Settings allow consulting providers to personalize profiles and manage account security for an enhanced experience.

<figure><img src="/files/f6EPJ9BAEbyTG2dYFR9f" alt=""><figcaption></figcaption></figure>

1. **Profile**
   * View and edit personal details like name, gender, and description.
   * Manage professional credentials, including certificates and insurance information.
   * Update billing and banking details, office information, and clinic details.
2. **Deactivate account**<br>

   <figure><img src="/files/oCk1giOUchfLw64sfHWQ" alt=""><figcaption><p>Deactivate Account</p></figcaption></figure>
3. **Change Password**
   * In the "Change Password" section, patients can make their account safer by choosing a new, stronger password for logging in.<br>

     <figure><img src="/files/wdr1NsgHCG9b9cXMpc0c" alt=""><figcaption><p>Change Password</p></figcaption></figure>


# My Clinics

This page give the overview how the service provider can switch to another clinic.

## Overview

As a service provider if you consult at multiple clinics and need to access another clinic. So, in this feature provider can switch to another clinic that is assigned by the admin. Users have the flexibility and convenience, ensuring they can access the relevant information and manage their appointments across different clinics seamlessly with the same availability.

<figure><img src="/files/B7GhrDtdHj5q6vJQ0YYR" alt=""><figcaption><p>My Clinics</p></figcaption></figure>

## Action

1. Service providers can switch to another clinic from here.<br>

   <figure><img src="/files/BWOiIWiBAdW1LqJX9XgT" alt=""><figcaption><p>Switch Clinic</p></figcaption></figure>
2. And service providers can switch to another clinic directly from their profile also.\ <br>

   <figure><img src="/files/OTAEab55D3fBqfDnvdTT" alt=""><figcaption><p>From profile switch to another clinic</p></figcaption></figure>


# Support

Access FAQs, share feedback for platform improvement in Support section.

In the Support section, access FAQs for quick answers and provide feedback to enhance the platform. Your input matters for improving your experience!

### FAQs section

Find quick answers to common queries by exploring the "FAQ" section, providing helpful resources for your use.

<figure><img src="/files/yD345k4KsKGBbC4XKmNe" alt=""><figcaption><p>FAQs</p></figcaption></figure>

### Provide Feedback

Share your insights and suggestions for platform improvement through the "Provide Feedback" functionality.

<figure><img src="/files/cBbgiyNcrgoK6AGQTxln" alt=""><figcaption><p>Provide Feedback</p></figcaption></figure>


# Legal

In the legal section, access terms and conditions and privacy policies.

### Terms and Condition

Familiarize yourself with the platform's usage guidelines by reviewing the "Terms & Conditions" section, ensuring compliance with platform rules.

### Privacy Policy

Understand how your data is collected, used, and protected by reading the "Privacy Policy," promoting transparency and trust.


# Dashboard

After logging in as a referring provider, access your dashboard for appointment and referral status. Take quick actions like making referrals and updating availability, and find answers in the FAQs section.

<figure><img src="/files/6sIAi65LYBMZLw5lEvJy" alt=""><figcaption></figcaption></figure>

### Appointment Status&#x20;

Here, you'll find details on appointment status:

1. **Request Updates Count:** Shows pending referral requests.
2. **Completed Request Count**: Displays successfully completed referral requests.

### Quick Action&#x20;

1. **Make a Referral:** Initiate patient referrals for specialized care.
2. **Setting**: Update you profile, change password.
3. **FAQs:** Access quick answers to common questions for assistance.


# Patient List

The referring provider can access patient records, appointments, and care details for comprehensive management.

### Overview

In the patient section, you can access patient records, appointments, and care details. Review demographics, appointments, documents, notes, mood, goals, diary entries, and e-forms for comprehensive patient management.

<figure><img src="/files/P9ViEyPgOpE9EQYF3rNc" alt=""><figcaption><p>Patient List</p></figcaption></figure>

### Patient List

Access a record of patients scheduled for appointments or under your care.&#x20;

Click on a specific patient to view detailed information. Here, you will find the different tab

**Demographic Tab:**

* Displays date of birth and last visit.
* Patient's Details include parent's name, contact, and preferred name.
* Medical History lists medications, allergies, vaccinations, height, weight, and blood pressure logs.

**Appointment Tab:**

* View all appointments, including past, pending, completed and cancelled.
* You can click on individual appointments to access detailed information and download appointment summaries for reference or documentation purposes.

**Document Tab:**

* Access documents related to the patient's medical history, treatment plans, or diagnostic reports and add new ones.
* Download patient history and specific documents.

**Notes Tab:**

* Consulting providers can attach prescriptions or download existing prescriptions related to the patient's treatment

**Invite Link Tab:**

* This tab shows any follow-up links sent by doctors or healthcare providers for scheduling additional appointments or follow-up consultations.

**Mood Tab:**

* View weekly mood and history, apply filters for diagnosis.

**Goal Tab:**

* Monitor patient's goal progress.

**Diary Tab:**

* Access patient's diary entries and notes.

**E-Form Tab:**

* This tab allows consulting providers to track the completion status of E-form assigned to the patient


# Appointment

Referring provider track and manage referral notes.

### Overview&#x20;

The Appointment section for referring providers allows them to manage patient referrals efficiently. There are three main tabs: Pending, Completed, and Cancelled, each representing the status of the referral request.

<figure><img src="/files/3Oulpet5ynvZSG9JcGT1" alt=""><figcaption><p>Apponintment Section</p></figcaption></figure>

### Pending Tab

<figure><img src="/files/mQISeOfT3HVxVIxwwbyD" alt=""><figcaption></figcaption></figure>

* In this tab, referral requests from patients are displayed.
* Basic details of the patient, such as name, date of birth, last visit date, referral creation date, requested specialization, and reason for referral, are shown.
* Referring providers have two options: approve or decline the referral.
  1. If the referral is approved, a pop-up screen appears where the referring provider must provide a reason before submitting.<br>

     <figure><img src="/files/LY0jgktjoABZo7HC5uiW" alt=""><figcaption><p>Approve referral </p></figcaption></figure>
  2. If the referral is declined, a similar pop-up appears for providing a reason for the decline.<br>

     <figure><img src="/files/fqxRkaGGAuyBG2CKVlvT" alt=""><figcaption><p>Decline Referral</p></figcaption></figure>

### Completed Tab

* Referral requests that have been approved by the referring provider and a reason has been provided are moved to this tab.
* These referrals have been successfully completed and addressed.

### Cancelled Tab

* Referral requests that have been declined by the referring provider and a reason has been provided are moved to this tab.
* These referrals have been cancelled due to the provider's decision.


# Refer a patient

The referring provider can initiate patient referral process seamlessly with these essential steps.

### Overview

Referring a patient involves initiating the process of transferring their care to another healthcare provider or specialist, typically for further evaluation, diagnosis, or treatment.

<figure><img src="/files/UCnh8VnRmYofYl162goq" alt=""><figcaption><p>Refer a Patient</p></figcaption></figure>

### Referring a patient, follow these steps:

1. **Patient Search**: Easily find patient information using their name.
2. **Choosing Specialty:** Select the appropriate treatment category and after that on next stepper, you can provide a reason for the referral.
3. **Attachments:** Attach relevant documents to support the referral process.
4. **Referral Verification:** Double-check referral details before submission.


# Notification

Stay informed to referring provider with alerts for referrals, and messages.

Stay updated on referrals, and messages in the Notification section.&#x20;

<figure><img src="/files/v7OSxervbtx6kAsClSC4" alt=""><figcaption></figcaption></figure>


# Settings

Referring provider update their profile, manage credentials, billing, deactivate account, change password.

Settings allow referring providers to personalize profiles and manage account security for an enhanced experience.

<figure><img src="/files/qauDMFmyRVZgIB5eqVxR" alt=""><figcaption><p>Setting Section</p></figcaption></figure>

1. **Profile**
   * View and edit personal details like name, gender, and description.
   * Manage professional credentials, including certificates and insurance information.
   * Update billing and banking details, office information, and clinic details.
2. **Deactivate account**
3. **Change Password**
   * In the "Change Password" section, patients can make their account safer by choosing a new, stronger password for logging in.


# My Clinics

This page give the overview how the referring provider can switch to another clinic.

## Overview

As a referring provider if you consult at multiple clinics and need to access another clinic. So, in this feature provider can switch to another clinic that is assigned by the admin. Users have the flexibility and convenience, ensuring they can access the relevant information and manage their appointments across different clinics seamlessly with the same availability.

<figure><img src="/files/B7GhrDtdHj5q6vJQ0YYR" alt=""><figcaption><p>My Clinics</p></figcaption></figure>

## Action

1. Referring Providers can switch to another clinic from here.<br>

   <figure><img src="/files/BWOiIWiBAdW1LqJX9XgT" alt=""><figcaption><p>Switch Clinic</p></figcaption></figure>
2. And referring providers can switch to another clinic directly from their profile also.\ <br>

   <figure><img src="/files/OTAEab55D3fBqfDnvdTT" alt=""><figcaption><p>From profile switch to another clinic</p></figcaption></figure>


# Support

Access FAQs, share feedback for platform improvement in Support section.

In the Settings section, access FAQs for quick answers and provide feedback to enhance the platform. Your input matters for improving your experience!

### FAQs section

Find quick answers to common queries by exploring the "FAQ" section, providing helpful resources for your use.<br>

<figure><img src="/files/ygQrhD9hCnirK0uDmRH7" alt=""><figcaption><p>FAQ's Section</p></figcaption></figure>

### Provide Feedback

Share your insights and suggestions for platform improvement through the "Provide Feedback" functionality.<br>

<figure><img src="/files/DNcQQwElq8f2rUzHZ7Cw" alt=""><figcaption><p>Provide Feedback </p></figcaption></figure>


# Legal

In the legal section, access terms and conditions and privacy policies.

### Overview&#x20;

In the legal section, access terms and conditions and privacy policies.

### Terms and Condition

Familiarize yourself with the platform's usage guidelines by reviewing the "Terms & Conditions" section, ensuring compliance with platform rules.

### Privacy Policy

Understand how your data is collected, used, and protected by reading the "Privacy Policy," promoting transparency and trust.


# Dashboard

Efficient patient interface: Track moods, set goals, maintain diaries, and manage appointments in one platform.

### Overview&#x20;

* The patient dashboard offers a comprehensive overview of their progress, including mood tracking, goal management, diary entries, and appointment scheduling.&#x20;
* With features for recording daily activities and setting goals, patients can monitor their health journey efficiently while providers and admins can access their information for better patient care.
* In the patient dashboard, there are three tabs: Overall, Goal, Mood, and Diary.

<figure><img src="/files/eeg0RG0DJeXyHe6haQTZ" alt=""><figcaption><p>Dashboard</p></figcaption></figure>

### 📅 Overall Tab

<figure><img src="/files/23s6HSQf6rh1UGNnBw6H" alt=""><figcaption><p>Overall Tab</p></figcaption></figure>

* **Analytical Report:** Shows progress based on set goals. Patients track progress linked to the first four goals on the overall tab.
* **Today's Mood**: Tracks current mood.
* **Calendar:** Displays recent and upcoming appointments.
* **Today's Diary:** Records daily activities and updates.
* **Follow-Up**: Follow-up appointments are displayed as cards on the patient's dashboard with details like provider name, case number, and a "Book Now" button.
* **Upcoming Appointment**: Lists scheduled appointments. The lists all your upcoming appointments in chronological order. You can quickly see when your next appointment is scheduled and make sure you don't miss it.

### Mood Tab

<figure><img src="/files/iYg1wVY5sNOGQejey5br" alt=""><figcaption><p>Mood Tab</p></figcaption></figure>

* Weekly mood chart displayed in a calendar format
* Mood entries appear in the calendar when added
* Stores history of mood entries for reference
* Filter by date range for specific mood records
* Record mood data weekly to track emotional well-being
* Add new mood entries to monitor changes over time
* When adding mood:
  1. Pop-up displays to enter mood (e.g., annoyed, angry)
  2. Select reason for mood
  3. Write description (optional)
  4. Submit the data

### 🎯Goal Tab&#x20;

* List of goals with details: goal name, cycle, value, start date, end date, action (edit, view)
* Patients track progress linked to the first four goals on the overall tab.
* Filter out the data from date range filter.
* When adding goal:
  1. Pop-up displays to enter goal
  2. **Goal Name:** Enter the name of your goal.
  3. **Value:** Specify the numerical value of your goal.
  4. **Unit:** Define the unit of measurement for your goal (e.g., hours, pounds, dollars).
  5. **Cycle:** Choose the cycle duration for your goal (e.g., daily, weekly, monthly).
  6. **Goal Start Date:** Select the start date for your goal.
  7. **End Date:** Choose the end date for your goal.
  8. **Description:** Optionally, provide a description or additional details about your goal.
  9. Click on the "Submit" button to save your goal.

### 📝 Diary Tab

* The patient diary such as a personal journal to record daily activities and routines.
* The add-diary section includes calendar and notes section.
* Following that, the diary part contains the add-diary section, through which a patient can add the notes he added.


# My Family

This gives the information of family of patient: Register family, manage appointments, documents, notes, referrals, and invites

### Overview&#x20;

When patient navigates into the My Family section.

Then it will see the lists of their family. So, primary patient can register their family into our platform on behalf of their family he can book the appointment, ask for referrals, see all their documents, notes, invite link.

<figure><img src="/files/6GCWy0ROCgH6IKRzqB1Y" alt=""><figcaption><p>My family section </p></figcaption></figure>

When you click on particular family you can see the details of the family member:

1. **Demographics:** Vital information including name, age, gender, contact details, pharmacy and family physician information.
2. **Appointments:** Summary of scheduled appointments, showing completed, canceled, and pending appointments.
3. **Documents:** Store and access important medical records for family member.
4. **Notes:** View health-related notes to aid communication with consulting providers.
5. **Invite Link:** Store and manage follow-up appointment links sent by consulting providers for booking appointments.

### Adding Family member

<figure><img src="/files/1OJDsdL1sNUGvhsZOSPb" alt=""><figcaption><p>Add family </p></figcaption></figure>

1. **Fill in patient personal details**: First name, last name, date of birth, biological gender, gender identification, preferred name.
2. **Enter health card details:** Insurance provider, insurance number, insurance expiry date, and upload insurance document if desired.
3. Optionally, add a profile picture.
4. Submit the form to add the family member.

Ready to book appointments for your family? You can move to the next section to book Appointments.


# Appointment

This page gives information of managing, tracking, book appointments, and requesting referrals easily.

### Overview&#x20;

In appointments section, helps you manage your appointments easily. Track their status—pending, completed, cancelled, or upcoming. Book appointments by selecting a patient, choosing a specialization, picking a time slot, adding payment details, and confirming.&#x20;

<figure><img src="/files/bD3sGrgNnPijgJpqOWVh" alt=""><figcaption><p>Appointment</p></figcaption></figure>

### **Appointment Status**

Monitor appointment statuses: pending, completed, cancelled, and upcoming.

1. **Pending:** Appointments awaiting referral approval.<br>

   <figure><img src="/files/n21CDNzv2ZyQqBHkgyKs" alt=""><figcaption><p>Pending </p></figcaption></figure>
2. **Upcoming:** Scheduled appointments ready for joining (After approval from the consulting provider you will be able to join the call).&#x20;

   <figure><img src="/files/CmBeKu1D5r0LIFJ4lyXi" alt=""><figcaption><p>Upcoming Tab</p></figcaption></figure>

   **Action:**&#x20;

   1. Join the video call
   2. Reschedule the appointment
   3. Cancel the appointment
   4. Chat with the provider
   5. Invite another user during the call

   **Join Video call**

   1. Patient users can join the video call 10 minutes before the scheduled appointment.&#x20;
   2. After joining the call user will find the functionality for patients:

      * **Camera and Mic Control:** Users can turn their camera and mic on or off according to their preference.
      * **Screen Sharing:** User can share their screen, window, or tab.&#x20;
      * **View Appointment Information:** Patients and providers can access detailed information about each other during the call via the "View Appointment Information" button.
      * **Patient Notes:** Here, is the medical history of the patient which they can fill their medical history during the booking of an appointment.
      * **Change Layout:** Users can change the layout of the screen during the call using a new layout icon, allowing for customized viewing preferences.

   **Rescheduled Appointment**

   1. Users can reschedule the booked appointment before 24 hours of a scheduled appointment.
   2. Otherwise, within 24 hours, the rescheduled icon is hidden.

   **Cancel Appointment**&#x20;

   1. Users can cancel the appointment at any time. But they can cancel the appointment before 24 hours, the cancellation charge will not be charged to the patient. However if they can cancel the appointment within 24 hours of the scheduled appointment, the patient has to pay a penalty for the appointment.

   **Chat with Provider**

   1. Patients and providers can chat and share media (images, documents, PDFs, and links) up to 48 hours before the scheduled time.
   2. **During Appointment:** Chat remains available throughout the appointment, allowing real-time communication.
   3. **After Appointment:** Communication continues after the appointment is completed.
   4. **Read-Only Mode:** If an appointment is cancelled, the chat becomes read-only. Users can view past messages but cannot send new ones or attachments.
   5. **Notifications:** Real-time alerts for new text messages, images, documents, and links include direct access to the chat.
3. **Completed:** Successfully attended appointments or referral completed information is shown here.<br>

   <figure><img src="/files/ef0VEP7sf73OtLTqAiiH" alt=""><figcaption><p>Completed</p></figcaption></figure>
4. **Cancelled:** Appointments and referrals are no longer active. Appointments that have been cancelled by either the patient or the provider.<br>

   <figure><img src="/files/bFVX0AkjIOgq121wPGrf" alt=""><figcaption><p>Cancelled</p></figcaption></figure>

**Appointment Creation Process**

<figure><img src="/files/BGjtqULCbEzWjjJ2hTsC" alt=""><figcaption><p>Add appointment</p></figcaption></figure>

1. The system presents options to choose between **Existing Cases** and **Create New Cases.**
2. **Select Case Type** (**Existing Case**): A search and listing interface appears, allowing him to filter cases. A list of active case loads, displaying relevant details like case number and status. And for ongoing steps, all fields are auto-filled such as specialization, provider and medical history but you have the flexibility to change any field.<br>

   <figure><img src="/files/KsCg9l73dQbojSJuFpfS" alt=""><figcaption><p>Existing Case</p></figcaption></figure>
3. **Select Case Type** (**Create New Case**):  The system prompts the patient to search for a current patient profile. After the appointment is booked and approval from the service provider, the new case number is created.<br>

   <figure><img src="/files/sNXDSTHbVMOa81N7LzfU" alt=""><figcaption><p>Create New Case</p></figcaption></figure>
4. **Specialization**: Select the appointment type or medical specialization.<br>

   <figure><img src="/files/bWFD4ug9PacEHkDXZMPt" alt=""><figcaption><p>Specialization</p></figcaption></figure>
5. **Provider Display**: Choose a provider or let one be assigned. Also, you can see the profile of the doctor and their rating and reviews.<br>

   <figure><img src="/files/qQtFcaxTOXOcOSqZjjk2" alt=""><figcaption></figcaption></figure>

   <figure><img src="/files/rsFaLBZZJRjD2WMd38Ah" alt=""><figcaption><p>View profile of provider</p></figcaption></figure>
6. **Time Slot Selection**: Pick a suitable time slot.
   1. At the top, you can see a calendar with available dates.
   2. Click on the date you prefer from the options provided. The dates shown in white are available for booking.
   3. Below the date, you will see the duration of the appointment (e.g., 15 minutes).
   4. You can choose either **Online** or **In-person** for your appointment type by clicking on the buttons.
7. **Medical History:** Document the medical history of the patient.
8. **Payment Details**: User can find the details of the payment related to their appointment.&#x20;
   1. **Appointment verification details:** You can see the all details related to the appointment.

   2. There is the option of the selection of the **insurance** or **package** (If any package is available to the patient).

   3. **Wallet Money:** Patient will use their wallet money to deduct the total charges. If the patient has the money. Then simply book the appointment.

   4. If the patient has an insufficient amount, have to add the money into their wallet through the stripe.<br>

      <figure><img src="/files/Sj369qMCO9Smt0yl5owt" alt=""><figcaption><p>Add money to Wallet</p></figcaption></figure>

   5. If you choose the package, you will not pay for the appointment charges. Your appointment credit will deducted from your package.


# Ask for Referral

In this section, patient can able to ask for a referral

In the Ask for Referral section, patients can easily request referrals.

<figure><img src="/files/plSwzFVHHkJpIcLy4VwK" alt=""><figcaption><p>Ask for referral</p></figcaption></figure>

Referral Creation Process

1. **Patient Search**
   * Access the patient search feature to find patient information using their name.
2. **Select Specialty**
   * After selecting the patient, choose the appropriate specialty or treatment category that best fits the patient's needs, such as mental illness or nausea
3. **Choose Referring Provider**
   * A list of available referral doctors will be displayed. Select the referring provider who you believe would be best suited for the patient's needs.
4. **Provide Reason and attachment**
   * Explain the reason for the referral. This helps the specialist understand the patient's situation better and provide appropriate care.&#x20;
   * Attach Documents: If you have any relevant documents or files that could support the referral, such as medical records or test results, you can attach them here. This additional information can help the specialist make informed decisions about the patient's care.

     <br>

<br>


# Notifications

### Overview

The Notification section in the patient dashboard provides updates on appointments, referrals, and messages.

Patients stay informed about important events such as upcoming appointments and new messages, ensuring they never miss any crucial information.

<figure><img src="/files/xpLZTkdO39PgQFeSU7Hw" alt=""><figcaption><p>Notifications</p></figcaption></figure>


# Transactions

This section gives the information of transaction

In the transaction section here you can see the list of all transaction history.

<figure><img src="/files/Vn3bMp6LlhJHcb7OZFTi" alt=""><figcaption><p>Transaction</p></figcaption></figure>

1. In **all tab** here you see the pending, completed, and failed transactions.
2. In **pending tab**, there is a list of pending transactions status visible.
3. In **completed tab**, there is a list of successful transactions status visible.
4. In **failed tab**, there is a list of failed transactions is visible.

### Search and Filter Functionality

Patient can search by the name of the patient and filter by the date range.


# Resources

In the Resources section, patients can access e-forms and articles.

Lets move into the E-form section.


# E-form

When patients access the e-form section, they see a list of forms assigned to them or their family members.

### **1. Viewing E-form**

* **Name:** Displays the name of the e-form, typically indicating its purpose.
* **Assigned Date**: Shows when the e-form was assigned to the patient.
* **Due Date**: Indicates the deadline by which the patient must complete the form.
* **Assignees**: Lists individuals responsible for verifying form completion.
* **Status**:
  1. **Pending**: Form has not been completed yet.
  2. **In-Progress**: Patient is currently working on the form.
  3. **Completed**: Patient has finished filling out the form.
* **Actions**:
  1. **View Questions**: Allows patients to see the questions included in the form.
  2. **Write Answers**: Permits patients to provide answers to the questions.
  3. **Write Answer Icon (Conditional)**:
     * Disabled if the form is pending and the due date has passed.
     * Enabled if the form is in progress or completed.

### **2. Status Management**

* **Pending Status**

  If the due date is exceeded, the write answer icon becomes inactive.
* **In Progress Status**

  Answers are not saved until the patient completes the form.

  If answers are not saved, the status remains in progress.
* **Completed Status**

  Patients can freely write their answers upon completion.

### 3. Search and filter functionality

* Patients can search for specific e-forms by name.
* Filters allow patients to sort forms by due date and status.


# Article

In this section, patient can see the list of article. Here, patient can filter on basis of article title, search any article.

<figure><img src="/files/Mx3r9zOgwZ2zigilRwNr" alt=""><figcaption><p>Article section</p></figcaption></figure>


# Case Management

This page provides an overview of the case management system, displaying case details, appointments, and book appointment

## Overview

It is a comprehensive view of a patient's cases and related appointments. Patients can view, filter, and manage all their active and past cases, book new appointments, and track their consultation history. The interface allows easy access to appointment details, case information, and provider interactions.

* Navigate to the **Case** **Management** section in the side menu.
* The page displays the total number of cases linked to the patient.
* The patient can **filter** cases using various options such as providers, specializations, and patients or **search** for cases by case number, provider name, specialization, or patient name.
* Each case card contains key details like **Case ID**, **Total Appointments**, **Last Appointment Details**, and the **Upcoming Appointment** (if any). An option to **Add Appointment** is also available.<br>

  <figure><img src="/files/eqy1w3jTsjjoVWzzuneW" alt=""><figcaption><p>Case Management</p></figcaption></figure>

**Booking a New Appointment in an Existing Case**

* The patient clicks on the **Add Appointment** icon on the case card or within the case details page.
* When booking a new appointment under the same case:
  * **Existing Details Auto-fill**: The patient’s **specialization**, **provider**, and **medical history** are pre-filled based on the latest appointment, but the patient can edit the specialization and provider if needed.
  * **Appointment Confirmation**: Once the appointment is booked, it is automatically added to the same case, unless the provider manually changes the case number.
  * If the appointment requires approval, the appointment status will reflect **“Waiting for Consulting Provider”** until approved.

<figure><img src="/files/kMBNiTWQLjYBLbk94J4s" alt=""><figcaption><p>Book Appointment</p></figcaption></figure>

## **Viewing Case Details**

* Clicking the card redirects to a detailed view of the selected case.
* In the detailed view, the admin can toggle between three tabs: **Appointments**, **Notes**, and **Follow-up Links**.
  * **Appointments Tab**: Lists all associated appointments categorized by status (upcoming, completed, or cancelled). Each appointment includes information about the referral provider, specialization, appointment type, and service provider.
  * **Notes Tab**: Displays all notes attached to the patient by the service provider, organized by the appointment linked to this case.
  * **Follow-up Links Tab**: Displays follow-up links under the same case.


# Package

Manage and explore service packages for seamless patient experience.

## Overview

The **Package Management** feature provides patients with a streamlined process for viewing, purchasing, and managing service packages. This feature enhances patient engagement by allowing them to easily access recommended packages, book appointments, and utilize their package credits during bookings.

<figure><img src="/files/6QRYMi5vMZoTu87eQmPW" alt=""><figcaption><p>Package</p></figcaption></figure>

## View

The patient sees a card displaying any packages recommended or current packages.

**Detailed of Current Package:** Package Name and Services, Total Appointments and Validity Period, Completed Appointments, Missed Appointments, Remaining Appointments Count, Transaction History (PDF download option), Pricing and Date of Purchase.

**Detailed view of Recommended Package:** Package Name, Services Included, Total Appointments, Validity, Purchase now


# Settings

Settings provide options to personalize profiles, and manage account security for an enhanced experience.

### **1. Profile**&#x20;

In the "Profile" section, patients can edit their personal details such as name, contact information, and address. Additionally, they can upload a profile picture to personalize their account and provide more context to healthcare providers.

### 2. My credit cards

In the "My Credit Cards" section, patients can securely add their credit card information for convenient payment processing during appointment bookings on the platform.

### 3. Change Password

In the "Change Password" section, patients can make their account safer by choosing a new, stronger password for logging in.


# Support

In the Settings section, access FAQs for quick answers and provide feedback to enhance the platform. Your input matters for improving your experience!

### FAQs section

Find quick answers to common queries by exploring the "FAQ" section, providing helpful resources for your use.

### Provide Feedback

Share your insights and suggestions for platform improvement through the "Provide Feedback" functionality.


# Legal

In the legal section, access terms and conditions and privacy policies.

### Terms and Condition

Familiarize yourself with the platform's usage guidelines by reviewing the "Terms & Conditions" section, ensuring compliance with platform rules.

### Privacy Policy

Understand how your data is collected, used, and protected by reading the "Privacy Policy," promoting transparency and trust.